Contents Show
The Manage Inventory screen is used to manage breastfeeding items and food items. The user can filter the results list by keying a product description or by keying a product ID.
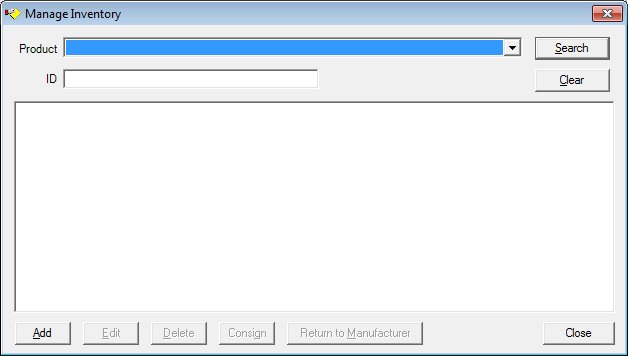
Manage Inventory screen
|
|
Interface InitializationUpon initial display of the screen, the following occurs:
If records are listed in the data grid:
If records are not listed in the data grid:
|
Unless otherwise stated below, all controls on the Manage Inventory screen are visible and enabled when:
The screen is active.
If one or more special conditions exist that affect a control on the Manage Inventory screen, the condition(s) are documented for that specific control below.
Select the product type for which to search in the Product drop-down list box.
The drop-down list box will be enabled when the screen is active. The control is initially blank. It will be loaded with product descriptions concatenated from the MANUFACTURER, MANUFACTURERBRAND, and MANUFACTURERBRANDTYPE tables plus the descriptions from the Reference Dictionary for "INVPDCTSUBCLASSUSE" and "INVPDCTSUBCLASSTYP" for each product in the PRODUCT table. The list will appear in alphabetic order. No entry will be initially selected.
Enter the identifier of a specific item for which to search in the ID text box.
All or part of the ID may be entered to locate the inventory.
The control is initially blank.
The results of this filter will return specific inventory items that are tracked individually by unit. For example each breastpump may be recorded as an individual item under the product inventory and tracked by a user-assigned ID number. The quantity for each ID is one.
|
|
NOTE: Enter a partial identifier in ID to search for all products with an identifier that begins with the numbers provided. Try to provide as much of the identifier as possible. The more numbers provided, the more specific the search will be, and the less time it will take to complete. |
Click the Search button to perform a search and filter the results displayed in the data grid based on the filter criteria specified.
When Search is clicked, the data grid refreshes and displays results that match the specified filter criteria.
It has a mnemonic of "S".
If no records can be found to match the specified search criteria, a standard error message (E0050) displays when the Search button is clicked.
If no entry has been made in either the Product drop-down list box or the ID text box when Search is clicked, the system displays all inventoried breastfeeding items in the Search Results data grid.
It has a mnemonic of "C".
View the information in the Search Results data grid.
Click an inventory item in this data grid to perform additional functions. This data grid displays inventory items as determined by the search criteria applied using the Search button.
An entry will be added to the data grid for each item in inventory that matches the filter criteria. The entries in the data grid will be displayed in ascending order by the Description column. The values on the data grid are read-only. The data grid will initially be blank. The user may select a single entry in the data grid.
The results of this filter will return inventory quantities available for the product selected along with a count of quantity in stock for the product for inventory that is not tracked. It will display each associated inventory item for the selected product if the inventory is tracked individually by ID such as breastpumps and the quantity for each ID is one.
The data grid consists of the following control(s):
Description column
This column displays the description of each record displayed within the data grid.
The title of the column is set to "Description". The information displayed within the column is read-only. The column header and the data within the column are left aligned.
The data is from INVENTORY.PRODUCT.
ID column
This column displays the identification number for each record displayed within the data grid.
The title of the column is set to "ID". The information displayed within the column is read-only.
The data is from INVENTORYITEM.SERIALNBR.
Quantity column
This column displays the item quantity for each record displayed within the data grid.
The title of the column is set to "Quantity". The information displayed within the column is read-only.
The data is from INVENTORYCONSIGNED.QUANTITY or a "1".
Disposition column
This column displays the disposition for each record displayed within the data grid.
The title of the column is set to "Disposition". The information displayed within the column is read-only.
The data is from INVENTORYITEM.STATUS.
It has a mnemonic of "A".
The Add New Inventory screen displays when the button is clicked.
Upon return to the screen, the system refreshes the data grid accordingly.
When the button is clicked, a check is performed to determine whether the logged-on user has the appropriate permissions to view the screen. When the user does not have the appropriate permissions, a standard error message (E0006) displays.
If the user does have the InventoryManagement.Add or the InventoryManagement.FullControl permissions, the system will display the Add New Inventory screen.
The control is enabled when:
A record is selected in the data grid.
It has a mnemonic of "E".
If the item is a trackable asset, the Inventory Item screen displays when the button is clicked.
If the item is a non-trackable asset, the Inventory Level screen displays when the button is clicked.
When the button is clicked, a check is performed to determine whether the logged-on user has the appropriate permissions to view the screen. When the user does not have the appropriate permissions, a standard error message (E0006) displays.
If the user does have the InventoryManagement.Add or InventoryManagement.FullControl permissions, the system will display either the Inventory Level screen if the selected item is a non-trackable asset or the Inventory Item screen if the selected item is a trackable inventory item.
The control is enabled when:
A record is selected in the data grid.
It has a mnemonic of "D".
When the button is clicked, a standard confirmation message (C0004) displays. The options of Yes and No are available. When Yes is clicked, the system deletes the record from the database. The contents on the Manage Inventory screen are refreshed. When No is clicked, the system returns to the Manage Inventory screen (the current screen) without deleting the selected record.
If the selected record is associated with at least one other record in the system or is in use, the system displays a standard error message (E0007). Click the OK button to return to the Manage Inventory screen (the current screen).
The following permissions are checked: InventoryManagement.FullControl.
Click the Consign button to consign an item selected in the Search Results data grid.
The Consign Inventory screen displays when the button is clicked.
The control is enabled when:
A record is selected in the data grid.
It has a mnemonic of "G".
The Consign Inventory screen displays when the button is clicked.
When the button is clicked, a check is performed to determine whether the logged-on user has the appropriate permissions to view the screen. When the user does not have the appropriate permissions, a standard error message (E0006) displays.
If the user does have the InventoryManagement.FullControl permission, the system will display the Consign Inventory screen. Upon returning to the screen, the Search Results data grid will be refreshed.
Click the Return to Manufacturer button to return an item selected in the Search Results data grid to the manufacturer.
The control is enabled when:
A trackable asset with a disposition of "Consigned" is selected in the data grid.
A trackable asset with a disposition of "Retired from Inventory" is selected in the data grid.
It has a mnemonic of "M".
The Return Inventory to Manufacturer screen displays when the button is clicked.
When the button is clicked, a check is performed to determine whether the logged-on user has the appropriate permissions to view the screen. When the user does not have the appropriate permissions, a standard error message (E0006) displays.
If the user does have the InventoryManagement.FullControl permission, the system will display the Return Inventory to Manufacturer screen. Upon returning to the screen, the Search Results data grid will be refreshed.
It does not have a mnemonic. Its keyboard shortcut is the Esc (escape) key.
The Participant List screen displays when the button is clicked.
If data can be validated and saved on the screen, the following processes occur when the screen is processed:
A process to check for required controls as identified in the Data Map below is performed.
A process to check for valid entries as identified individually for each applicable control in Screen Elements above is performed.
A process to check for edits and cross edits as identified for each applicable control in Screen Elements above is performed.
If any checks or processes fail, a standard error message displays.
If no data can be validated and saved on the screen:
No cross edits are performed.
All values are considered legitimate.
No data is written to the database.
The Data Map defines the values saved for all controls on the screen. If available, any additional notes or comments are displayed in the Notes column.
|
Control Label |
Required |
Table |
Column |
Notes |
|
· |
· |
· |
· |
· |
|
· |
· |
· |
· |
· |
|
· |
· |
· |
· |
· |
|
· |
· |
· |
· |
· |
|
· |
· |
· |
· |
· |
|
Software Version: 2.40.00
![]()

