Contents Show
The Role Profile screen is used to manage roles and permissions for a user.
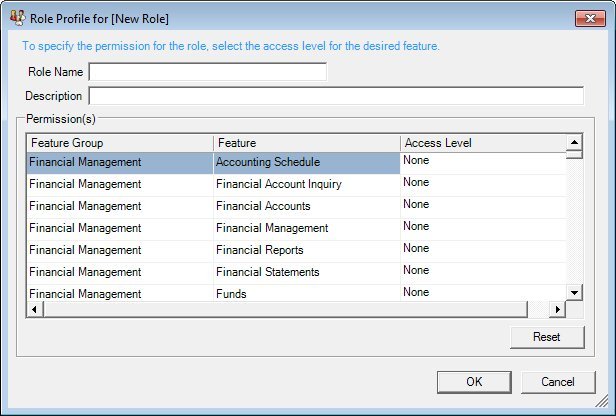
The screen can be displayed in Add mode, Edit mode, or Details mode. In Details mode, the information displayed on the screen is read-only and cannot be updated.
Role Profile screen (Add mode)
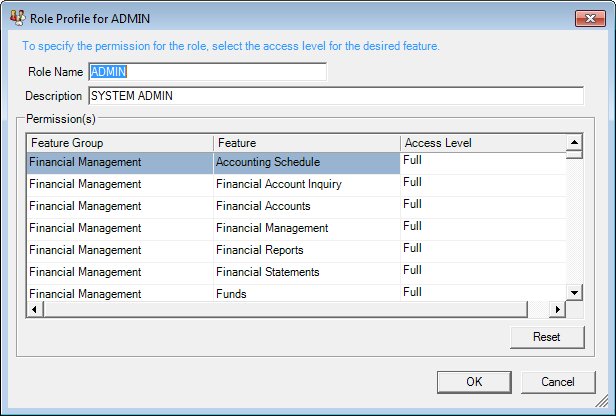
Role Profile screen (Edit mode)
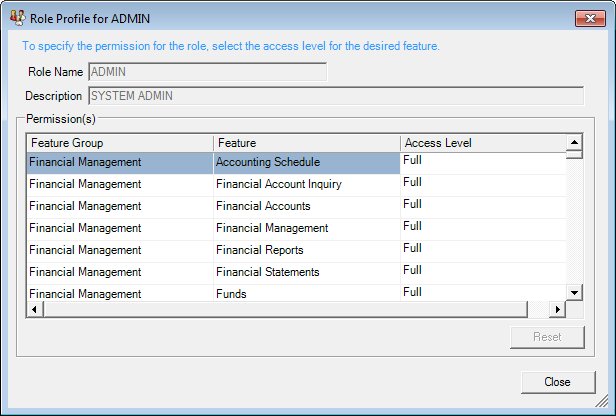
Role Profile screen (Details mode)
|
|
To add a new role:
To edit the details of an existing role:
To view the details of an existing role:
To add a new role while working with a user profile on the User Profile screen:
To edit an existing role while working with a user profile on the User Profile screen:
To view the details of an existing role while working with a user profile on the User Profile screen:
In Add mode:
In Edit mode:
In Details mode:
|
The process of adding a new user would be as follows (assuming the system administrator creating the user has the appropriate permissions):
Create a user (must be a user in the active directory).
Assign the user as a staff member to one or more locations.
For each location, select one or more roles that the user may assume as a staff member of the location.
If there is no appropriate role, create one and assign the appropriate permissions to the role.
Alternatively, designate the user as a Clerk (this will create a staff member relationship for each clinic with a role of Clerk).
Unless otherwise stated below, all controls on the Role Profile screen are visible and enabled when:
The screen is displayed in Add mode.
The screen is displayed in Edit mode.
Unless otherwise stated below, all controls on the Role Profile screen are visible and disabled when:
The screen is displayed in Details mode.
If one or more special conditions exist that affect a control on the Role Profile screen, the condition(s) are documented for that specific control below.
View the informational text on the screen in the Informational Text value label. Informational text provides information about the current process being performed on the screen.
The informational text is displayed as follows:
"To specify permission for the role, select the access level for the desired feature."
Information in this control is read-only and cannot be changed. The value label displays in the inverse color of the screen.
Enter the name of the role in the Role Name text box.
The text box allows only the entry of alphabetic characters and the space special character. The maximum number of characters that can be entered in the text box is fifty (50).
The control is enabled when:
The current user's permission (feature/access level) is "Add" or "Full".
The role name must be unique. If it is not, when the screen is processed the system displays the E0060 standard error message.
Enter the brief description of the role in the Description text box.
The text box only allows the entry of alphabetic characters and the space special character. The maximum number of characters that can be entered in the text box is one hundred thirty-five (135) characters.
The control is enabled when:
The current user's permission (feature/access level) is "Add" or "Full".
View or update the information in the Permission(s) editable data grid.
View or update the current permissions assigned to the staff member in the data grid. The title text of the data grid is set to "Permission(s)". The data grid contains a row for each feature group or permission record that currently exists within the Permissions Matrix. The records in the data grid are sorted in alphabetical order by the Feature Group column.
|
|
NOTE: Refer to the Permissions Matrix for additional information about permissions and roles. |
The control is enabled when:
The current user's permission (feature/access level) is "Add" or "Full".
The data grid consists of the following control(s):
Feature Group column
This column displays the staff member's assignment location for each record displayed within the data grid.
The title of the column is set to "Feature Group". The information displayed within the column is read-only.
Feature column
This column displays the role(s) applicable for each staffing assignment record displayed within the data grid.
The title of the column is set to "Feature". The information displayed within the column is read-only.
Access Level column
This column contains a drop-down list box for each record displayed within the editable data grid. Select the level of access ("None", "View", "Add", or "Full") for each permission record displayed within the data grid.
The title of the column is set to "Access Level". The information displayed within the column is editable.
Click the Reset button to reset the changes made to permission records in the Permission(s) data grid to the initial or previously-saved settings.
The control is enabled when:
The current user's permission (feature/access level) is "Add" or "Full".
It does not have a mnemonic.
Click the OK button to process the screen.
It is the default button for the screen, unless otherwise noted.
The control is visible and enabled when:
The screen is displayed in Add mode.
The screen is displayed in Edit mode.
It does not have a mnemonic. Its keyboard shortcut is the Enter key.
Depending on which screen originally called the Role Profile screen, one of the following screens displays when the button is clicked:
The control is visible and enabled when:
The screen is displayed in Add mode.
The screen is displayed in Edit mode.
It does not have a mnemonic. Its keyboard shortcut is the Esc (escape) key.
If there are unsaved changes on the screen when this button is clicked, a standard confirmation message (C0002) displays. The options of Yes and No are available. In certain instances, Cancel is also available.
If the Cancel button is clicked, the standard confirmation message is dismissed, the changes are discarded, and the current screen displays.
If the No button is clicked, the standard confirmation message is dismissed, the changes are discarded, and the previous screen displays.
If the Yes button is clicked, the standard confirmation message is dismissed and the screen is processed. If errors are encountered during processing, the standard error messages display, and the user is returned to the current screen. If no errors are encountered during processing, the changes are saved and the previous screen displays.
Depending on which screen originally called the Role Profile screen, one of the following screens displays when the button is clicked:
The control is visible and enabled when:
The screen is displayed in Details mode.
It does not have a mnemonic. Its keyboard shortcut is the Esc (escape) key.
Depending on which screen originally called the Role Profile screen, one of the following screens displays when the button is clicked:
If data can be validated and saved on the screen, the following processes occur when the screen is processed:
A process to check for required controls as identified in the Data Map below is performed.
A process to check for valid entries as identified individually for each applicable control in Screen Elements above is performed.
A process to check for edits and cross edits as identified for each applicable control in Screen Elements above is performed.
If any checks or processes fail, a standard error message displays.
If no data can be validated and saved on the screen:
No cross edits are performed.
All values are considered legitimate.
No data is written to the database.
The Data Map defines the values saved for all controls on the screen. If available, any additional notes or comments are displayed in the Notes column.
|
Control Label |
Control Type |
Table. Column |
Notes |
|
Informational Text |
value label |
· |
· |
|
~+Role Name |
text box |
ROLE. ROLENAME |
· |
|
~+Description |
text box |
ROLE. DESCRIPTION |
· |
|
Permission(s) |
editable data grid |
· |
· |
|
+Feature Group |
data grid column |
REFERENCEDICTIONARY. DESCRIPTION |
category = "FEATUREGROUP" |
|
+Feature |
data grid column |
FEATURE. DESCRIPTION |
· |
|
+Access Level |
data grid column |
ACCESSLEVEL. DESCRIPTION |
· |
~ Denotes a required control (if applicable). The process that checks for required controls does not occur on screens displayed in read-only or Details mode.
+ Denotes data written to the database when screen processing occurs (if applicable). The process that writes data to the database does not occur on screens displayed in read-only or Details mode.
|
Software Version: 2.40.00
![]()

