Contents Show
The User Profile screen is used to add new users to the system and manage existing user profile records.
The screen can be displayed in Add mode, Edit mode, or Details mode. In Details mode, the information displayed on the screen is read-only and cannot be updated.
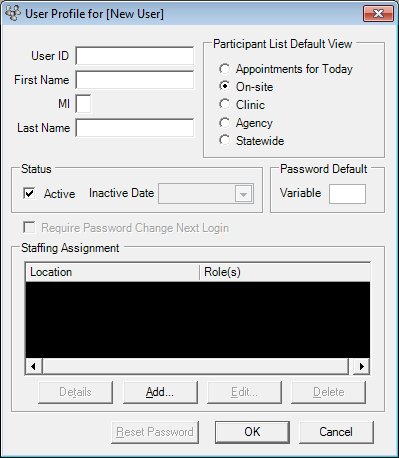
User Profile screen (Add mode)
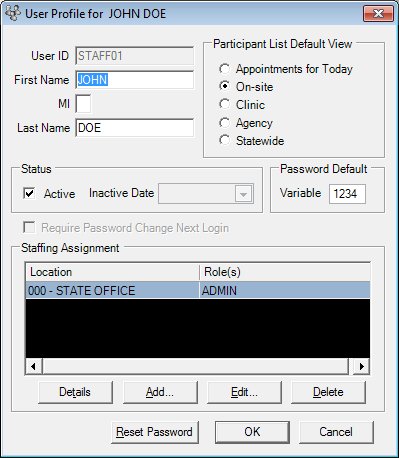
User Profile screen (Edit mode)
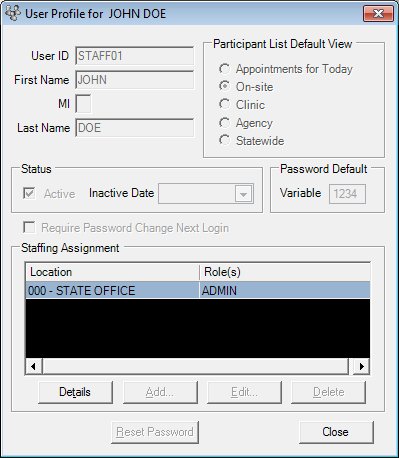
User Profile screen (Details mode)
|
|
To add a new user profile:
To edit an existing user profile:
To view the details of an existing user profile:
In Add mode:
In Edit mode:
In Details mode:
|
The process of adding a new user would be as follows (assuming the system administrator creating the user has the appropriate permissions):
Create a user (must be a user in the active directory).
Assign the user as a staff member to one or more locations.
For each location, select one or more roles that the user may assume as a staff member of the location.
If there is no appropriate role, create one and assign the appropriate permissions to the role.
Alternatively, designate the user as a Clerk (this will create a staff member relationship for each clinic with a role of Clerk).
Unless otherwise stated below, all controls on the User Profile screen are visible and enabled when:
The screen is displayed in Add mode.
The screen is displayed in Edit mode.
Unless otherwise stated below, all controls on the User Profile screen are visible and disabled when:
The screen is displayed in Details mode.
If one or more special conditions exist that affect a control on the User Profile screen, the condition(s) are documented for that specific control below.
Enter the staff member user identification in the User ID text box.
The text box allows the entry of alphabetic and numeric characters. The system will convert all entered characters to upper case. The minimum length allowed for the value is specified by the minimum value specified on the User Profile screen in the Management Console application. The maximum length allowed for the value is specified by the USERIDMAXLENGTH business rule. The maximum user ID length that can be stored in the database is twenty (20) characters. The User ID is not case sensitive.
The control is enabled when:
The screen is displayed in Add mode.
The User ID entered must be at least specified number of characters as defined by the state. If it is not, when the screen is processed they system displays the E0331 standard error message.
|
|
NOTE: After the initial creation of a user's profile, the User ID cannot be changed. |
Enter the first name in the First Name text box.
The text box allows the entry of alphabetic and special characters. Numeric characters are not allowed. Special characters are limited to the following: period (.), hyphen (-), apostrophe ('), and comma (,). The maximum number of characters that can be entered in the text box is twenty (20) characters.
Enter the first letter of the middle name in the MI text box.
The text box allows the entry of alphabetic characters only. Numeric and special characters are not allowed. The maximum number of characters that can be entered in the text box is one (1) character.
Enter the last name in the Last Name text box.
The text box allows the entry of alphabetic and special characters. Numeric characters are not allowed. Special characters are limited to the following: period (.), hyphen (-), apostrophe ('), and comma (,). The maximum size of the text box is twenty-five (25) characters.
Select an option in the Participant List Default View radio button group.
This radio button group includes controls that allow you indicate which view of the Participant List screen displays by default when the staff member launches the application. The title text of the radio button group is set to "Participant List Default View". The following radio buttons are included in the group:
Appointments for Today radio button
Select this radio button to indicate that the Appointments for Today view of the Participant List screen displays by default when the staff member launches the Central Administrative Site, Clinic, or State Office application.
On-site radio button
Select this radio button to indicate that the On-site view of the Participant List screen displays by default when the staff member launches the Central Administrative Site, Clinic, or State Office application.
Clinic radio button
Select this radio button to indicate that the Clinic view of the Participant List screen displays by default when the staff member launches the Central Administrative Site, Clinic, or State Office application.
Agency radio button
Select this radio button to indicate that the Agency view of the Participant List screen displays by default when the staff member launches the Central Administrative Site, Clinic, or State Office application.
Statewide radio button
Select this radio button to indicate that the Statewide view of the Participant List screen displays by default when the staff member launches the Central Administrative Site, Clinic, or State Office application.
Complete the information in the Status group box.
The group box displays controls that allow the manipulation of the user's status. The title text of the group box is set to "Status". The following controls are included in the group box:
Active check box
Check this check box to activate or deactivate an item. An active item is available to the application. An inactive item can be obsolete or omitted or can be a new item pending activation.
When checked, the user is allowed access the application.
Inactive Date calendar control
Select or enter the date on which the record (or item) becomes inactive in this calendar control.
The date selected or entered inactivates the user account on the date specified.
The control is enabled when:
The Active check box is unchecked.
Complete the information in the Password Default group box.
This group box includes a control that allows you to enter a password variable for the default system-assigned password. The title text of the group box is set to "Password Default". The following control is included in the group box:
Variable text box
Enter the 4-digit numeric variable portion of the password default specific to the user profile in this text box.
The control is enabled when:
The default password is set to User Specific.
The default password is set to User Specific.Only numeric characters are allowed. The maximum number of characters that can be entered in the text box is four(4).
Select the Require Password Change Next Login check box to indicate the user is required to change the password the next time they log into one of the SPIRIT applications.
The control is disabled when:
The screen is displayed in Add mode.
The current password is the same as the default password.
This check box defaults to checked if the previously saved value is "Y". Otherwise, it is blank if the previously saved value is "N".
View the information in the Staffing Assignment data grid.
This data grid contains the current staffing assignments for the staff member. The title text of the data grid is set to "Staffing Assignment". Each assignment indicates the location and role(s) applicable for that assignment. The data grid contains a row for each staffing assignment record that currently exists within the database and is currently associated with the staff member. The records in the data grid are sorted in numerical order by the Location column.
The data grid consists of the following control(s):
Location column
This column displays the staff member's assignment location for each record displayed within the data grid.
The title of the column is set to "Location". The information displayed within the column is read-only.
Role(s) column
This column displays one or more roles applicable for each staffing assignment record displayed within the data grid.
The title of the column is set to "Role(s)". The information displayed within the column is read-only.
Click the Details button to view the details of the record currently selected in the data grid.
The control is visible and enabled when:
A record is selected in the data grid.
It has a mnemonic of "T".
The Staffing Assignment screen displays in Details mode when the button is clicked.
It has a mnemonic of "A".
The Staffing Assignment screen displays in Add mode when the button is clicked.
Upon returning to this screen after completion of the required controls and clicking the OK button on the Staffing Assignment screen, the Staffing Assignments data grid is refreshed.
The control is visible and enabled when:
A record is selected in the data grid.
It has a mnemonic of "E".
The Staffing Assignment screen displays in Edit mode when the button is clicked.
Upon returning to this screen after completion of the required controls and clicking the OK button on the Staffing Assignment screen, the Staffing Assignments data grid is refreshed.
The control is enabled when:
The screen is displayed in Add mode.
The screen is displayed in Edit mode.
A record is selected in the data grid.
It has a mnemonic of "D".
When the button is clicked, a standard confirmation message (C0004) displays. The options of Yes and No are available. When Yes is clicked, the system deletes the record from the database. The contents on the User Profile screen are refreshed. When No is clicked, the system returns to the User Profile screen (the current screen) without deleting the selected record.
Click the Reset Password button to reset the staff member's password or release the lockout for a user who has had more than the allowable number of invalid login attempts.
The control is enabled when:
The screen is displayed in Add mode.
The screen is displayed in Edit mode.
A password is set for the user.
It has a mnemonic of "R".
The system sets the initial password for the user based on the selection made in the Default radio button group on the Settings screen. The system sets the indicator on the user profile record to foce the user to change the password on the next login. The LockedOut column on the user profile record is set to "N" when the user has been locked out due to exceeding the maximum allowable number of invalid login attempts. The password set date in the user profile is reset to the current system date. If a new value or updated value was entered in the Variable text box, the value is saved to the database. The system displays the I0053 standard information message.
Click the OK button to process the screen.
It is the default button for the screen, unless otherwise noted.
The control is visible and enabled when:
The screen is displayed in Add mode.
The screen is displayed in Edit mode.
It does not have a mnemonic. Its keyboard shortcut is the Enter key.
When the default password is set to User Specific, the system sets the user's password using the following information:
First character of the user's first name
First character of the user's last name
Four character numeric user specific entry in the Variable text box.
Two pound signs ("##")
When the default password is set to Global, the system sets the user's password to the global default password specified on the Settings screen.
When the password has been set for the new user, the system displays the I0053 standard information message.
If the Require Password Change Next Login check box is checked, the system sets the PwdChangeNextLogin column to "Y" in the user profile record indicating that a password change is required for the next login.
The system sets the LockedOut column to "N" in the user profile record indicating the user is not locked out.
Saving the user profile updates the system using the information displayed on the screen and subsequently dismisses the screen. Saving the user profile will also prompt the system to check for duplicate User IDs. If the ID entered is a duplicate, the system displays the I0005 standard warning message. Staffing Assignments are not saved during this operation. Changes to the staffing assignments are saved at the time the data grid is modified.
The WIC Management Console screen displays when the button is clicked.
The control is visible and enabled when:
The screen is displayed in Add mode.
The screen is displayed in Edit mode.
It does not have a mnemonic. Its keyboard shortcut is the Esc (escape) key.
The WIC Management Console screen displays when the button is clicked.
The control is visible and enabled when:
The screen is displayed in Details mode.
It does not have a mnemonic. Its keyboard shortcut is the Esc (escape) key.
The WIC Management Console screen displays when the button is clicked.
If data can be validated and saved on the screen, the following processes occur when the screen is processed:
A process to check for required controls as identified in the Data Map below is performed.
A process to check for valid entries as identified individually for each applicable control in Screen Elements above is performed.
A process to check for edits and cross edits as identified for each applicable control in Screen Elements above is performed.
If any checks or processes fail, a standard error message displays.
If no data can be validated and saved on the screen:
No cross edits are performed.
All values are considered legitimate.
No data is written to the database.
The Data Map defines the values saved for all controls on the screen. If available, any additional notes or comments are displayed in the Notes column.
|
Control Label |
Control Type |
Table. Column |
Notes |
|
~+User ID |
text box |
UserProfile.User_ID |
· |
|
~+First Name |
text box |
UserProfile.First_Name |
· |
|
+MI |
text box |
UserProfile_Middle_Initial |
· |
|
~+Last Name |
text box |
UserProfile_Last_Name |
· |
|
+Participant List Default View |
radio button group |
UserProfile.Part_List_View_Default |
· |
|
+Active |
check box |
UserProfile.Active_Ind |
· |
|
+Inactive Date |
calendar control |
UserProfile.Inactive_Dt |
Required if the Active check box is not checked. |
|
~+Variable |
text box |
UserProfile.PwdDefaultVariable |
· |
|
Require Password Change Next Login |
check box |
· |
· |
|
Staffing Assignment |
data grid label |
· |
· |
|
Location |
data grid column |
ServiceSite.ServiceSiteName |
· |
|
Role(s) |
data grid column |
Role.RoleName |
· |
|
~+Reset Password |
button |
UserProfile.Password |
· |
~ Denotes a required control (if applicable). The process that checks for required controls does not occur on screens displayed in read-only or Details mode.
+ Denotes data written to the database when screen processing occurs (if applicable). The process that writes data to the database does not occur on screens displayed in read-only or Details mode.
|
Software Version: 2.40.00
![]()

