Contents Show
Concepts Show
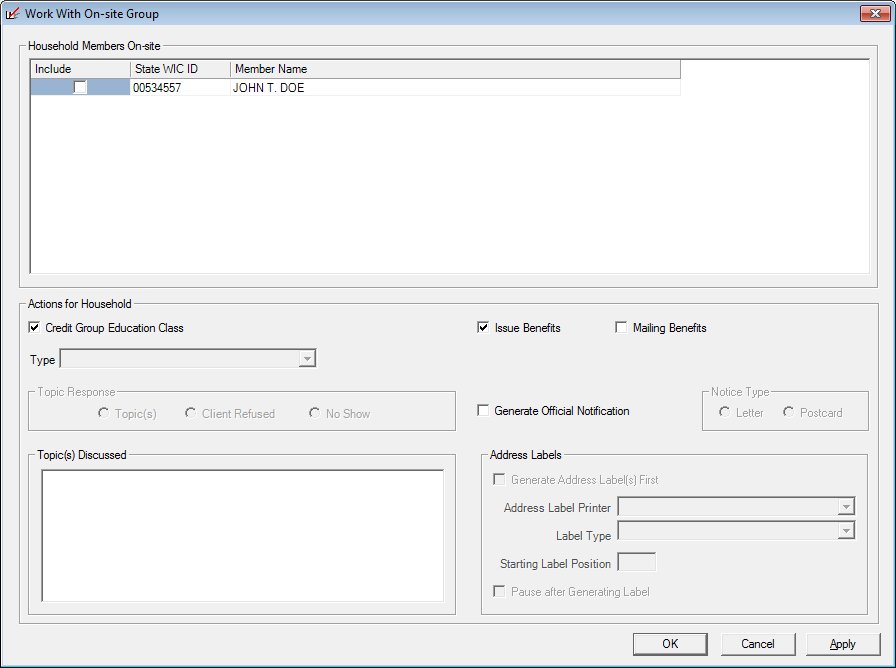
The Work with On-site Group screen is used to work with clients who have been identified as being on-site at the Clinic of Operation and the members of their households who have completed or are in the process of completing a Certification. The actions selected on this screen are applied to the clients selected in the Household Members On-site data grid.
Work with On-site Group screen
|
|
Interface InitializationUpon initial display of the screen, the following occurs:
If records are listed in the data grid:
If records are not listed in the data grid:
For EBT clinics:
For non-EBT clinics:
When the value of the CLN_BenefitsStartOnFirstDayOfMonth business rule = "Y" and month-to-month issuance is enabled, the following processes also occur when the screen is initially displayed:
|
Unless otherwise stated below, all controls on the Work with On-site Group screen are visible and enabled when:
The screen is active.
If one or more special conditions exist that affect a control on the Work with On-site Group screen, the condition(s) are documented for that specific control below.
View or update the information in the Household Members On-site editable data grid.
|
|
NOTE: Participants are listed if they have started a Certification Guided Script or have completed a certification and at least one member of the household has been marked on-site on the Toggle On-site screen. |
This editable data grid displays all clients who have been toggled on-site. The editable data grid displays a row for each certified member of each household for which at least one member has been marked On-site. The title text of the data grid is set to "Household Members On-site". The check boxes in the Include column can be selected to include a household member in a selected action or unchecked to remove a household member from a selected action. The check boxes are unchecked by default. All other columns are read-only. Check the check box in the Include column of this editable data grid for each client to be included in the intended action(s). The rows are sorted in ascending order by Household ID, and then in ascending order by the State WIC ID column. All household members after the first are indented slightly to show the household relationship.
If a check box in the Include column is selected while the Credit Group Education Class check box is selected, the Type drop-down list box value is set to, "Secondary Contact (at Check Pick-up)", and the Topic(s) Discussed list box is populated with group education topics from the EDUCATIONTOPIC table that are:
Active
Of the, "Secondary Contact," Group Contact Type
Assigned to the participant's WIC Category or unassigned to any WIC Category.
If all the check boxes in the Include column of the editable data grid are unchecked while the Credit Group Education Class check box is selected, the Type drop-down list box value is cleared and the Topic(s) Discussed list box is cleared.
If at least one check box in the Include column of the editable data grid is not selected, the system displays the E0127 standard error message.
The On-site status of all members for whom benefits were generated is toggled to Off-site. If the Apply button is clicked, Members toggled Off-site will still be displayed in the editable data grid to avoid the possible confusion that names being removed and rearranged might cause and to give the user a consistent group listing. If the OK button is clicked, the screen is dismissed after benefits are printed. Upon re-display of the screen, the members for whom benefits were printed are cleared from the editable data grid; however, if multiple members of a household are still listed in the editable data grid and benefits have not been printed for all members at once, the all members of the household are still listed in the editable data grid.
The WWOG-DISPLAY business rule helps determine how the clients are displayed in this data grid. If the value is set to "H", only the oldest household member will display. If the value is set to "M", all household members will display.
The data grid consists of the following control(s):
Include column
This column contains a check box for each record displayed within the editable data grid. Check this check box to select the record.
The title of the column is set to "Include". The information displayed within the column is editable.
When a check box is checked for one household member, all other household members are checked in the editable data grid. If one household member is unchecked, all other household members are unchecked in the editable data grid.
This column displays the state WIC identification number for each participant record displayed within the data grid.
The title of the column is set to "State WIC ID". The information displayed within the column is read-only.
The column header and data are left aligned.
The value is from the STATEWICID column of the MEMBER table.
Member Name column
This column displays the member's name for each record displayed within the data grid.
The title of the column is set to "Member Name". The information displayed within the column is read-only.
This member name displays as {MEMBER.FIRSTNAME MEMBER.MIDDLEINITIAL. MEMBER.LASTNAME}.
Complete the information in the Actions for Household group box.
This group box includes controls for various actions to be completed for the household members. The title text of the group box is set to "Actions for Household". The following controls are included in the group box:
Credit Group Education Class check box
Uncheck this check box to avoid crediting the selected clients with a group education class.
If the user has the appropriate permissions to credit group education class attendance (NutritionEducation.Add or FullControl), the check box is enabled and selected by default. If the user does not have the appropriate permissions, the check box is disabled and unchecked by default.
When the check box is selected and at least one check box in the Include column of the Household Members On-site editable data grid is selected, the Type drop-down list box value is set to, "Secondary Contact (at Check Pick-up)", and the Topic(s) Discussed list box is populated with group education topics from the EDUCATIONTOPIC table that are:
Active
Of the, "Secondary Contact," Group Contact Type
Assigned to the participant's WIC Category
When the check box is unchecked or all the check boxes in the Include column of the Household Members On-site editable data grid are unchecked, the Type drop-down list box value is cleared and the Topic(s) Discussed list box is cleared.
If the Credit Group Education Class check box, the Issue Benefits check box and the Generate Official Notification check box are not selected, the system displays the E0128 standard error message.
Upon successful completion of the edits, if the Credit Group Education Class check box is checked, only the selected (marked to include) members are credited with a group nutrition education contact for the current system day and the topic of the group education class selected in the Type drop-down list box. The EDUCATIONCONTACT table is updated with the following:
STATEWICID - A record is added for all participants selected in the Household Members On-site data grid.
CONTACTDATE - Set to the current system date
CONTACTMETHOD - Set to the REFERENCEDICTIONARY.EXTERNALID where the REFERENCEDICTIONARY category = "NEMETHOD" and the REFERENCEDICTIONARY descriptions = "Group".
CONTACTTYPE - Set to the value of the Type drop-down list box.
The EducationContactItem table is updated with the following:
STATEWICID - A record is added for all participants selected in the Household Members On-site editable data grid and each topic selected in the Topic(s) Discussed list box.
CONTACTDATE - Set to the current system date
CONTACTMETHOD - Set to the REFERENCEDICTIONARY.EXTERNALID where the Reference Dictionary category = "NEMETHOD" and the Reference Dictionary descriptions = "Group".
CONTACTTYPE - Set to the value of the Contact Type drop-down list box.
TOPICCD - Set to the value of the topic selected in the Topic(s) Discussed list box.
If a group education class has already been recorded for the selected STATEWICID for this date, the group education class will not be recorded for the participant and the system writes the E0046 standard error message to the Event Log - Work With On-site Group.
Type drop-down list box
When a participant is selected in the data grid and the Credit Group Education Class check box is checked, this drop-down list box is disabled and set to "Secondary Contact (at Check Pick-up)". The drop-down list box defaults to blank.
If the Credit Group Education Class check box is selected, a selection is required in the Contact Type drop-down list box.
Topic Response radio button group
Select an option in the Topic Response radio button group. This radio button group includes controls that allow you to specify the participant's response during the contact. The title text of the radio button group is set to "Topic Response". A selection is required in this radio button group.
The control is enabled when:
The Include check box is selected in the editable data grid.
The following radio buttons are included in the group:
Topic(s) radio button
Select this radio button to indicate that the participant discussed topics during this contact. Once selected, select the appropriate topics discussed in the Topic(s) Discussed list box.
Client Refused radio button
Select this radio button to indicate that the participant refused to discuss topics during this contact.
No Show radio button
Select this radio button to indicate that the participant was absent for the contact.
The control is disabled when:
The control is always disabled.
If the radio button selection is changed from Topic(s) to Client Refused, the topics previously selected in the Topic(s) Discussed list box are cleared.
Topic(s) Discussed list box
Select the topics discussed in the selected group education class. The list box is enabled when the Credit Group Education Class check box is selected and at least one check box in the Include column of the Household Members On-site data grid is selected. The list box allows the selection of multiple items.
The Topic(s) Discussed list box includes all group education topics from the EDUCATIONTOPICS table. The topics in the list box are sorted alphabetically in ascending order.
If the Credit Group Education Class check box is selected, a selection is required in the Topic(s) Discussed list box.
Issue Benefits check box
Uncheck this check box to avoid printing food instrument benefits for the selected clients who are eligible to receive them.
When the Issue Benefits check box is unchecked, the Mailing Benefits check box is unchecked and disabled.
When the Issue Benefits check box is checked, the Mailing Benefits check box is enabled. For EBT Clinics, the Mailing Benefits check box will not display.
If the Credit Group Education Class check box, the Issue Benefits check box, and the Generate Official Notification check box are not selected, the system displays the E0128 standard error message.
If the Issue Benefits check box is checked, food instruments are generated for the household member selected in the data grid if that member is eligible for benefits. Refer to the Issue Benefits screen.
Determine the PFDTU
When the Issue Benefits process is started, the system determines if the certification effective date is after the originally calculated PFDTU. If it is, and if the CLN_PromptForPFDTUAdjustment business rule is set to "Y", the Multiple PFDTU Dates Available screen displays to allow the user to adjust the original PFDTU to the originally calculated PFDTU if necessary.
The Issue Benefits for Participants of On-site Households process attempts to produce food instruments for those participants of the selected households who are eligible. The households are selected from the Household Members On-site editable data grid on the Work with On-site Group screen. The system displays the Capture Electronic Signature (for Receipt of Food Instrument Benefits) screen if the Issue Benefits check box is selected when the Apply or OK button is selected.
The process is a non-interactive process. It does not have a screen associated with it, although it calls other screens.
Determine the Order to Issue Benefits
When the Issue Benefits process is started, the system determines the order in which benefits should be issued to households included in the on-site group. The order in which benefits are printed for the on-site households is determined by the ONPREMISESDTTM column of the MEMBER table. The system checks the members of each household to determine the earliest time at which a member was marked as on-site. The earliest on-site time for each household is used to rank the households chronologically in ascending order.
Determine Benefits to Issue
When the Issue Benefits process is started, the system determines the benefits that should be issued for the households included from the on-site group. For each household, the system determines which household participants are eligible to receive benefits and the set(s) of benefits to issue to each participant. Refer to the Issue Benefits screen for further details.
Create Partial Month Issuance Based on Cycle-Adjusted Sets
Once sets of benefits have been determined for each household participant, the system determines the prorating of package sizes for the first set of benefits for each household participant according to the following:
The system calculates the number of days between the actual first date to use and the last date to use for the set of benefits. The upper limit for each food package size is stored in the following business rules:
For participants with a WIC Category of Infant:
I_MAX_DAYS_HALF_PACKAGE (1/2Max)
I_MAX_DAYS_THREE_QUARTER_PACKAGE (3/4Max)
For participants with a WIC Category of Child:
C_MAX_DAYS_QUARTER_PACKAGE (1/4Max)
C_MAX_DAYS_HALF_PACKAGE (1/2Max)
C_MAX_DAYS_THREE_QUARTER_PACKAGE (3/4Max)
For participants with a WIC Category of Breastfeeding:
B_MAX_DAYS_QUARTER_PACKAGE (1/4Max)
B_MAX_DAYS_HALF_PACKAGE (1/2Max)
B_MAX_DAYS_THREE_QUARTER_PACKAGE (3/4Max)
For participants with a WIC Category of Pregnant:
P_MAX_DAYS_QUARTER_PACKAGE (1/4Max)
P_MAX_DAYS_HALF_PACKAGE (1/2Max)
P_MAX_DAYS_THREE_QUARTER_PACKAGE (3/4Max)
For participants with a WIC Category of Non-breastfeeding:
N_MAX_DAYS_QUARTER_PACKAGE (1/4Max)
N_MAX_DAYS_HALF_PACKAGE (1/2Max)
N_MAX_DAYS_THREE_QUARTER_PACKAGE (3/4Max)
The upper limit for a Full package is not required as it is always the number of days in the issuance month:
For infants, the following chart shows the partial month issuance for formula:
|
Number of Days between Actual First Date to Use and Last Date to Use (inclusive) |
Food Package Size |
|
1 - 1/2Max |
1/2 package |
|
1/2Max+1 - 3/4Max |
3/4 package |
|
3/4Max+1 - Total Number of Days in Issuance Month |
Full package |
For women and children, the following chart shows the partial month issuance for milk and juice:
|
Number of Days between Actual First Date to Use and Last Date to Use (inclusive) |
Food Package Size |
|
1 - 1/4Max |
1/4 package |
|
1/4Max+1 - 1/2Max |
1/2 package |
|
1/2Max+1 - 3/4Max |
3/4 package |
|
3/4Max+1 - Total Number of Days in Issuance Month |
Full package |
Print Benefits
Once the system has determined the benefits to issue for the household, it will send print instructions to the Benefit Printer defined in System Tools for the sets of benefits to be issued to the household participants.
Retry Batch Issuance
In the event of communication failure with the EBT Processor system, the system will allow users to retry the batch issuance by launching the Work with On-site Group screen again. The system will determine which participants still have benefits that need to be issued and will attempt to issue those benefits as defined in the process above. The system will also attempt to resolve any pending issuances that exists as a result of previous communication errors. This applies to EBT-enabled clinics only.
Display Success/Error Messages
Upon completion of the above process, the Work with On-site Group screen will display success/standard error messages. If participants do not have benefits available for issuance, the system will display a message to notify the users. If a data error from the EBT Processor system occurs, the system will display a message and continue with the next issuance. All issuances and/or standard error messages will be logged in the Event Log - Work With On-site Group. This applies to EBT-enabled clinics only.
Mailing Benefits check box
Check this check box to generate an address label for each set of benefits printed. For EBT Clinics, the Mailing Benefits check box will not display.
The control is visible and enabled when:
The Electronic Benefit Transfer (EBT) food delivery system is not enabled for the current clinic.
The Issue Benefits check box is checked.
Upon selecting the check box, the Address Labels group box is enabled.
Upon unchecking the check box, if the Generate Official Notification check box is also unchecked, the Generate Address Label(s) First check box is unchecked and disabled.
Generate Official Notification check box
Check this check box to print official notices for selected clients who are pending termination of their participation in the local WIC program.
The control is enabled when:
The Mailing Benefits check box is checked.
Upon unchecking the check box, the Notice Type radio button group is cleared and disabled. If the Mailing Benefits check box is also unchecked, the Generate Address Label(s) First check box is unchecked and disabled.
If the Credit Group Education Class check box, the Issue Benefits check box and the Generate Official Notification check box are not selected, the system displays the E0128 standard error message.
If the Generate Official Notification check box is checked, an official notification is generated for all members of the household who will be terminated by automatic means and have at least one member marked for inclusion in the data grid. This includes all household members regardless of their On-site status. If a Categorical Ineligibility Date is not on record, the system displays the E0355 standard error message. The criteria for generating these notices and the format of the notices are defined in Generate Official Notification.
Notice Type radio button group
Select Letter or Postcard from this group box to indicate the form in which the notices should be generated. The title text of the radio button group is set to "Notice Type". If the Generate Official Notification check box is selected, a selection is required in the Notice Type radio button group.
The control is enabled when:
The Generate Official Notification check box is checked.
The following radio buttons are included in the group:
Letter radio button
Select this radio button to indicate the notice type is a letter.
Postcard radio button
Select this radio button to indicate the notice type is a postcard.
Address Labels group box
This group box includes controls to determine the address label(s) that are generated and printed. The title text of the group box is set to "Address Labels".
Click the Generate Address Label(s) First check box in this group box to indicate that a mailing label should be printed for each letter generated, and then complete the additional information.
Generate Address Label(s) First check box
If Generate Official Notifications is selected, check the Generate Address Labels First check box in this group box to generate address labels for the notices after the screen is processed. These labels are generated for selected household members who receive benefits or official notifications.
The control is enabled when:
The Mailing Benefits check box is checked.
The Generate Official Notification check box is checked.
If the Generate Address Label(s) First check box is checked, the system will generate address labels. The criteria for generating these address labels and the format of the labels is defined in Generate Client Address Label for Benefits.
Address Label Printer drop-down list box
Select the printer to which to send the labels.
The control is enabled when:
The Generate Address Label(s) First check box is checked.
The drop-down list box displays an entry for each label or other output printer defined for the system that is currently active. It defaults to blank.
Upon selecting an address label printer, the Label Type drop-down list box is populated.
Upon clearing an address label printer, the Label Type drop-down list box is cleared.
Label Type drop-down list box
Select the type of label stock loaded in the selected printer.
The control is enabled when:
The Generate Address Label(s) First check box is checked.
When the Address Label Printer selected is a laser printer, the drop-down list box is populated with label types from the REFERENCEDICTIONARY table where Category equals "LASERLABELS".
Upon selecting a label type, the Starting Label Position text box is enabled.
Upon clearing a label type, Starting Label Position text box is cleared and disabled.
Starting Label Position text box
If applicable, enter the number corresponding to the position of the first label to be printed on the first sheet of label stock. (Label positions are counted from left to right, starting at the top of the page and ending at the bottom.)
The control is enabled when:
A selection is made in the Label Type drop-down list box.
The control allows entry of numeric digits. The minimum value is 1 and the maximum value is the number of labels available on the selected label type.
If a laser printer is selected from the Address Label Printer drop-down list box, a selection is required in the Starting Label Position text box.
If the value entered in the Starting Label Position text box is greater than the number of labels available on the selected label type, the system displays the E0062 standard error message.
Pause after Generating Label check box
Check this check box to pause the printer after generating the labels. This allows the print stock to be changed before the notices are printed.
The control is enabled when:
The Generate Address Label(s) First check box is checked.
Click the OK button to process the screen.
It is the default button for the screen, unless otherwise noted.
It does not have a mnemonic. Its keyboard shortcut is the Enter key.
This button is only available if Household Members are listed in the Household Members On-site editable data grid.
The Event Log - Work With On-site Group screen displays when the button is clicked. When the Event Log - Work With On-site Group screen is dismissed, the Participant List screen displays.
It does not have a mnemonic. Its keyboard shortcut is the Esc (escape) key.
The Participant List screen displays when the button is clicked.
Click the Apply button to process the screen and/or save the data captured on the screen if applicable.
The screen is not closed when clicked. This allows you to perform additional processes on the screen quickly and easily.
This button is only available if Household Members are listed in the Household Members On-site editable data grid.
The Event Log - Work With On-site Group screen displays when the button is clicked. When the Event Log - Work With On-site Group screen is dismissed, the Work with On-site Group screen displays and all check boxes in the Include column of the Household Members On-site editable data grid are cleared.
If data can be validated and saved on the screen, the following processes occur when the screen is processed:
A process to check for required controls as identified in the Data Map below is performed.
A process to check for valid entries as identified individually for each applicable control in Screen Elements above is performed.
A process to check for edits and cross edits as identified for each applicable control in Screen Elements above is performed.
If any checks or processes fail, a standard error message displays.
If no data can be validated and saved on the screen:
No cross edits are performed.
All values are considered legitimate.
No data is written to the database.
The Data Map defines the values saved for all controls on the screen. If available, any additional notes or comments are displayed in the Notes column.
|
Control Label |
Control Type |
Table. Column |
Notes |
|
Household Members On-site |
data grid |
MEMBER. ONPREMISESDTTM |
Displays participants toggled on-site. |
|
Include |
data grid column |
· |
This check box allows you to select a particular participant. |
|
State WIC ID |
data grid column |
MEMBER. STATEWICID |
· |
|
Member Name |
data grid column |
MEMBER.FIRSTNAME + MEMBER.MIDDLEINITIAL. + MEMBER.LASTNAME |
· |
|
Actions for Household |
group box |
· |
This group box includes controls for various actions to be completed for the household members. |
|
Credit Group Education Class |
check box |
· |
Uncheck this check box to avoid crediting the selected clients with a group education class. |
|
Issue Benefits |
check box |
· |
If the Issue Benefits check box is checked, food instruments are generated for the household member selected in the data grid if that member is eligible for benefits. |
|
Mailing Benefits |
check box |
· |
Check this check box to generate an address label for each set of benefits printed. For EBT clinics, the Mailing Benefits check box is not visible. |
|
Type |
drop-down list box |
EDUCATIONCONTACT. CONTACTTYPE |
Populated from REFERENCEDICTIONARY.DESCRIPTION where CATEGORY should be ‘NETYPE'. |
|
Topic Response |
radio button group |
EDUCATIONCONTACT. NOSHOW EDUCATIONCONTACT. REFUSED |
Topic(s) radio button is selected by default. This indicates that the participant discussed topics during this contact. |
|
Generate Official Notification |
check box |
· |
Check this check box to print official notices for selected clients who are pending termination of their participation in the local WIC program. |
|
Notice Type |
radio button group |
· |
Indicates the form in which the notices should be generated. |
|
Topic(s) Discussed |
list box |
EDUCATIONCONTACTITEM. TOPICCD |
EDUCATIONTOPIC. DESCRIPTION |
|
Address Labels |
group box |
· |
This group box includes controls to determine the address label(s) that are generated and printed. |
|
Generate Address Label(s) First |
check box |
· |
If the Generate Address Label(s) First check box is checked, the system will generate address labels. |
|
Address Label Printer |
drop-down list box |
· |
This drop-down list box displays an entry for each label or other output printer that is defined for the system and currently active. It defaults to blank. |
|
Label Type |
drop-down list box |
REFERENCEDICTIONARY. DESCRIPTION |
REFERENCEDICTIONARY table where Category equals 'LASERLABELS'. |
|
Starting Label Position |
text box |
· |
If applicable, enter the number corresponding to the position of the first label to be printed on the first sheet of label stock. (Label positions are counted from left to right, starting at the top of the page and ending at the bottom.) |
|
Pause after Generating Label |
check box |
· |
Check this check box to pause the printer after generating the labels. This allows the print stock to be changed before the notices are printed. |
~ Denotes a required control (if applicable). The process that checks for required controls does not occur on screens displayed in read-only or Details mode.
+ Denotes data written to the database when screen processing occurs (if applicable). The process that writes data to the database does not occur on screens displayed in read-only or Details mode.
|
Software Version: 2.40.00
![]()

