The Generate Breastfeeding Initiation Report screen is available in the following application modules:
|
|
Central Administrative Site |
|
|
State Office |
Contents Show
The Generate Breastfeeding Initiation Report screen is used to generate a Breastfeeding Initiation Report OPR030 (Output) that contains infants born within a date range who were ever breastfed and certified once.
For detailed information about the system output generated, see Breastfeeding Initiation Report OPR030 (Output).
The Generate Breastfeeding Initiation Report screen is available in the following application modules:
|
|
Central Administrative Site |
|
|
State Office |
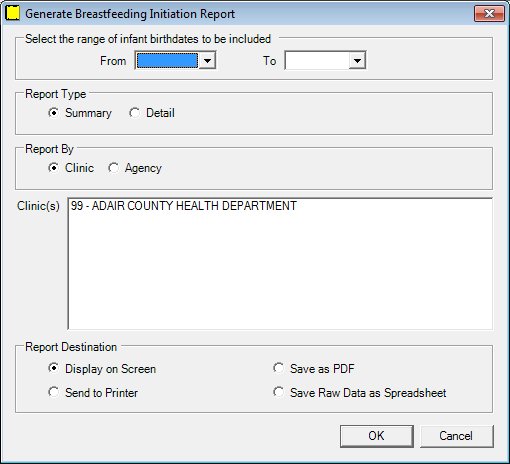
Generate Breastfeeding Initiation Report screen
|
|
Interface InitializationUpon initial display of the screen, the following occurs:
|
Unless otherwise stated below, all controls on the Generate Breastfeeding Initiation Report screen are visible and enabled when:
The screen is active.
If one or more special conditions exist that affect a control on the Generate Breastfeeding Initiation Report screen, the condition(s) are documented for that specific control below.
Complete the information in the Date Range group box.
This group box includes calendar controls that allow you to specify the date range for which to generate the system output. The title text of the group box is set to "Date Range". Complete the information in the following calendar controls to specify the date range the system output will cover:
From calendar control
Select or enter the starting date of the date range in this calendar control.
To calendar control
Select or enter the ending date of the date range in this calendar control.
The From date entered must be equal to or less than the To date entered. If not, a standard error message (E0047) displays when the screen is processed.
If the month/year entered is greater than the month/year value of the CurrentMonthEndDt column of the ProcessControl table, when the OK button is clicked the system displays the E0043 standard error message.
Select an option in the Report Type radio button group.
This radio button group includes controls that allow you to specify the amount of information to include in the generated report. The title text of the radio button group is set to "Report Type". A selection is required in this radio button group. The following radio buttons are included in the group:
Summary radio button
Select this radio button to generate a brief summary report.
Detail radio button
Select this radio button to generate a detailed report.
Select an option in the Report By radio button group.
This radio button group includes controls that allow you to filter the data displayed on the system output. The title text of the radio button group is set to "Report By". A selection is required in this radio button group. The following radio buttons are included in the group:
Clinic(s) radio button
Select this radio button to limit the data included on the report by one or more specific clinics.
Agency radio button
Select this radio button to include data for all clinics within the agency selected when you first logged in to the application on the system output.
View items in the Clinic(s) list box.
Select one or more clinics to include in the system output in this list box. The list box is enabled when the screen is active and the Clinic(s) radio button is selected in the Report By radio button group. Single or multiple selections are allowed. The clinics displayed in the list box are displayed in numeric order by Clinic ID and no clinic is initially selected.
The list box initially contains all clinics that belong to the agency selected when you first logged in to the application.
The control is enabled when:
The Clinic(s) radio button is selected.
Select an option in the Report Destination radio button group.
This radio button group includes controls that allow you to specify the destination of the generated system output. The title text of the radio button group is set to "Report Destination". A selection is required in this radio button group. The following radio buttons are included in the group:
Display on Screen radio button
Select the Display on Screen radio button to display the system output on your computer's monitor after it is generated. A report printer must currently be defined for your workstation.
Send to Printer radio button
Select the Send to Printer radio button to send the system output to the report printer currently defined for your workstation after it is generated. Printers are specified on the Default Printers screen.
Save as PDF radio button
Select the Save as PDF radio button to save the system output as a PDF file after it is generated.
Save Raw Data as Spreadsheet radio button
Select this radio button to save the raw data as an Excel file after it is generated.
|
|
NOTE: Within the application, printer selections for your workstation are defined on the Default Printers screen. |
Click the OK button to generate the system output.
It is the default button for the screen.
It does not have a mnemonic. Its keyboard shortcut is the Enter key.
Depending on the selection in the Report Destination radio button group, one of the following occurs when the OK button is clicked:
If the Display on Screen radio button is selected and a default printer has not been selected for the workstation, the system displays the Default Printers screen. If the user does not select a printer and clicks the Cancel button, a standard error message (E0051) displays. Upon dismissal of the standard error message, the user is returned to the Generate Reports screen. Otherwise, the system output is displayed on your computer's monitor after it is generated.
If the Send to Printer radio button is selected and a default printer has not been selected for the workstation, the system displays the Default Printers screen. If the user does not select a printer and clicks the Cancel button, a standard error message (E0051) displays. Upon dismissal of the standard error message, the user is returned to the Generate Reports screen. Otherwise, the system output is sent to the report printer currently defined for your workstation after it is generated.
If the Save as PDF radio button is selected, a Windows Save File As screen displays when the OK button is clicked. Select the folder and enter the file name to save the PDF file and click the OK button. When clicked, the system saves the file to the selected folder as the specified filename. Or, click the Cancel button to dismiss the Windows Save File As screen without saving the PDF file.
If the Save Raw Data as Spreadsheet radio button is selected, a Windows Save File As screen displays when the OK button is clicked. Select the folder and enter the file name to save the Excel file and click the OK button. When clicked, the system saves the file to the selected folder as the specified filename. Or, click the Cancel button to dismiss the Windows Save File As screen without saving the Excel file.
The system output is generated and the Generate Reports screen displays when the button is clicked. Some reports can take a bit of time to generate. For these reports, a progress bar displays when the button is clicked.
It does not have a mnemonic. Its keyboard shortcut is the Esc (escape) key.
The Generate Reports screen displays when the button is clicked.
If data can be validated and saved on the screen, the following processes occur when the screen is processed:
A process to check for required controls as identified in the Data Map below is performed.
A process to check for valid entries as identified individually for each applicable control in Screen Elements above is performed.
A process to check for edits and cross edits as identified for each applicable control in Screen Elements above is performed.
If any checks or processes fail, a standard error message displays.
If no data can be validated and saved on the screen:
No cross edits are performed.
All values are considered legitimate.
No data is written to the database.
The Data Map defines the values saved for all controls on the screen. If available, any additional notes or comments are displayed in the Notes column.
|
Control Label |
Required |
Notes |
|
From calendar control |
X |
· |
|
To calendar control |
X |
· |
|
Report Type radio button group |
X |
· |
|
Report By radio button group |
X |
· |
|
Clinic(s) list box |
X (when enabled) |
· |
|
Report Destination radio button group |
X |
· |
|
Software Version: 2.40.00
![]()

