Contents Show
The Default Printers screen captures the printer configuration for the WIC system.
The system recognizes 3 types of documents; checks, reports, and [all other] documents. The system is capable of storing a default printer for each of the document types as part of the user's profile. If the user's default printer for the document type is not defined, not found, or is invalid, the application will prompt the user to select a printer via the Windows Print screen screen. If the user is prompted to select a printer the application will ask the user if the selected printer (and paper source) should be retained as the default printer for the selected document type.
Checks are printed on 3-up check stock, meaning that 3 blank checks are on each page. The system prints the logo (if provided), state WIC ID, participant name, ITO Agency number, Clinic number, first date to use, last date to use, issued date, quantity or cash benefit amount, redeemable food item description, system generated check number, and MICR line on each check.
Once a request has been made to print checks the application will attempt to locate the default check printer. If the default printer cannot be located (or the default has not been set) the application will prompt the user to select the printer (and paper source) using the Windows Print screen screen. (Note that the application will not be capable of determining if the selected printer is MICR compatible, it is the responsibility of the user to select a printer that is supports MICR printing as well as the appropriate paper source for the printer.) Once a printer is selected and the print screen is successfully dismissed the print job will be submitted to the printer and the application will ask the user if the selected printer should be set as the default check printer.
Checks are printed in sets, meaning that if checks are being printed for more than one household (as is the case when printing checks for the Work with On-site Group) the print job will be separated into sets.
If during the printing process one or more checks are damaged, the user will be able to specify the checks to be reprinted using the add/replace functionality from the Participant Folder.
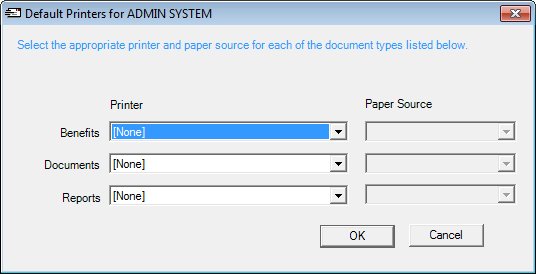
Default Printers screen
|
|
Display either the Participant List screen or the Participant Folder screen, and then do one of the following:
|
Unless otherwise stated below, all controls on the Default Printers screen are visible and enabled when:
The screen is active.
If one or more special conditions exist that affect a control on the Default Printers screen, the condition(s) are documented for that specific control below.
View the informational text on the screen in the Informational Text value label. Informational text provides information about the current process being performed on the screen.
The informational text displays as follows:
"Select the appropriate printer and paper source for each of the document types listed below."
Information in this control is read-only and cannot be changed. The value label displays in the inverse color of the screen.
Select the benefit printer and a paper source for the printer in the Benefits drop-down list boxes.
The selected printer and paper source will be used when benefits are being printed for WIC participants in the Clinic application and for compliance buy benefits in the Vendor application.
The first drop-down list box is populated with all available "installed printers" for the current workstation. Installed printers are determined by the operating system and are the same printers that can be viewed by selecting the View Printers and Faxes menu option from the Windows Control Panel. The first option displayed in the drop-down list box is "[None]".
The second drop-down list box is populated with all paper sources that are available for and supported by the printer selected in the first drop-down list box. The selected printer's default paper source will be selected as the default. Paper sources are specific to each printer and are the same sources that can be viewed on the Paper/Quality tab of the Preferences screen of the printer via the View Printers and Faxes menu option of the Windows Control Panel.
The control is enabled when:
A selection is made in the Benefits drop-down list box.
Select the document printer and the paper source in the Documents drop-down list boxes.
The selected printer and paper source will be used when documents are being printed.
The first drop-down list box is populated with all available "installed printers" for the current workstation. Installed printers are determined by the operating system and are the same printers that can be viewed by selecting the View Printers and Faxes menu option from the Windows Control Panel. The first option displayed in the drop-down list box is "[None]".
The second drop-down list box is populated with all paper sources that are available for and supported by the printer selected in the first drop-down list box. The selected printer's default paper source will be selected as the default. Paper sources are specific to each printer and are the same sources that can be viewed on the Paper/Quality tab of the Preferences screen of the printer via the View Printers and Faxes menu option of the Windows Control Panel.
The control is enabled when:
A selection is made in the Documents drop-down list box.
Select the reports printer and paper source in the Reports drop-down list box.
The first drop-down list box is populated with all available "installed printers" for the current workstation. Installed printers are determined by the operating system and are the same printers that can be viewed by selecting the View Printers and Faxes menu option from the Windows Control Panel. The first option displayed in the drop-down list box is "[None]".
The second drop-down list box is populated with all paper sources that are available for and supported by the printer selected in the first drop-down list box. The selected printer's default paper source will be selected as the default. Paper sources are specific to each printer and are the same sources that can be viewed on the Paper/Quality tab of the Preferences screen of the printer via the View Printers and Faxes menu option of the Windows Control Panel.
The control is enabled when:
A selection is made in the Reports drop-down list box.
Click the OK button to process the screen.
It is the default button for the screen, unless otherwise noted.
It does not have a mnemonic. Its keyboard shortcut is the Enter key.
Upon successful completion of the edits, the system will save the default printer and paper source for the selected user's profile.
Depending on which screen originally called the Default Printers screen, one of the following screens displays when the button is clicked:
It does not have a mnemonic. Its keyboard shortcut is the Esc (escape) key.
Upon selecting the Cancel button, the system will dismiss the Select Printers for [User] screen without saving and return to the calling screen/screen.
Depending on which screen originally called the Default Printers screen, one of the following screens displays when the button is clicked:
If data can be validated and saved on the screen, the following processes occur when the screen is processed:
A process to check for required controls as identified in the Data Map below is performed.
A process to check for valid entries as identified individually for each applicable control in Screen Elements above is performed.
A process to check for edits and cross edits as identified for each applicable control in Screen Elements above is performed.
If any checks or processes fail, a standard error message displays.
If no data can be validated and saved on the screen:
No cross edits are performed.
All values are considered legitimate.
No data is written to the database.
The Data Map defines the values saved for all controls on the screen. If available, any additional notes or comments are displayed in the Notes column.
|
Control Label |
Control Type |
Table. Column |
Notes |
|
Benefits |
drop-down list boxes |
· |
Saved locally in bin\defaultsettings.xml. |
|
Documents |
drop-down list boxes |
· |
Saved locally in bin\defaultsettings.xml. |
|
Reports |
drop-down list boxes |
· |
Saved locally in bin\defaultsettings.xml. |
|
Software Version: 2.40.00
![]()

