The Generate Missed Appointment Notices screen is available in the following application module:
|
Clinic |
Contents Show
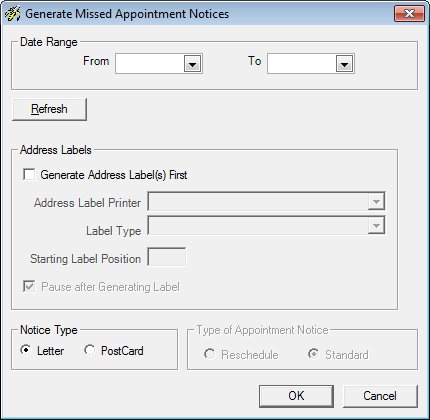
The Generate Missed Appointment Notices screen is used to generate a Missed Appointment Notice Document (Output) for applicants and participants that missed a scheduled appointment.
For detailed information about the system outputs generated, see:
The Generate Missed Appointment Notices screen is available in the following application module:
|
Clinic |
Generate Missed Appointment Notices screen (Generate Documents)
Generate Missed Appointment Notices screen (Follow-up Information)
|
|
Interface InitializationUpon initial display of the screen, the following occurs:
When the screen is called from the Generate Documents screen, the following also occurs:
|
Unless otherwise stated below, all controls on the Generate Missed Appointment Notices screen are visible and enabled when:
The screen is active.
If one or more special conditions exist that affect a control on the Generate Missed Appointment Notices screen, the condition(s) are documented for that specific control below.
Complete the information in the Date Range group box.
This group box includes calendar controls that allow you to specify the date range for which to generate the system output. The title text of the group box is set to "Date Range".
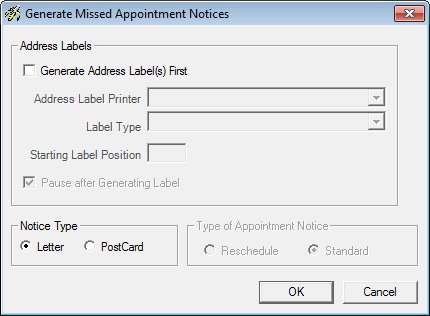
The control is not visible when:
The screen is displayed from the Follow-up Information screen.
Complete information in the following calendar controls to specify the date range the system output will cover:
From calendar control
Select or enter the starting date of the date range in this calendar control.
To calendar control
Select or enter the ending date of the date range in this calendar control.
The From date entered must be equal to or less than the To date entered. If the From date entered is not equal to or less than the To date entered, the system displays the E0047 standard error message.
The date selected or entered in the From and To calendar controls must be less than the current system date. If it is not, a standard error message (E0009) displays when the screen is processed.
Click the Refresh button to display the number of notices to be generated for the filter criteria specified.
The control is not visible when:
The screen is displayed from the Follow-up Information screen.
View the number of appointments with an appointment date prior to the current system date that were missed for which notices (and address labels if specified) will be generated in the Missed Appointment Notices to be Generated text and value label.
The control is visible when:
The Refresh button is clicked.
The control is not visible when:
The screen is displayed from the Follow-up Information screen.
The Appointment-Kept-Flag attribute is set to False for missed appointments. This information may be useful to gauge the necessary time and consumables (paper, ink, etc.) needed to complete the operation.
Information in this control is read-only and cannot be changed. The value label displays in the inverse color of the screen.
Complete the information in the Address Labels group box.
This group box includes controls that allow you to generate address labels while generating the system output. The title text of the group box is set to "Address Labels". Complete information in the following controls to generate address labels:
Generate Address Label(s) First check box
Check this check box to generate address labels while generating the system output.
Address Label Printer drop-down list box
Select the name of the printer on which to print the mailing labels in the Address Label Printer drop-down list box. The drop-down list box contains all currently-defined "other output printers" as options. The drop-down list box is initially blank as the default.
The control is enabled when:
The Generate Address Label(s) First check box is checked.
Label Type drop-down list box
Select the type of label stock loaded in the selected printer in this drop-down list box. The drop-down list box is filled with a list of label types from the Reference Dictionary table where category equals "LaserLabels". The drop-down list box is initially blank when enabled.
The control is enabled when:
A selection is made in the Address Label Printer drop-down list box.
Starting Label Position text box
Enter the number corresponding to the position of the first label to be printed on the first sheet of label stock in this text box. (Labels are printed from top to bottom.) The text box allows the entry of numeric characters only. Alphabetic and special characters are not allowed. The minimum value is 1 and the maximum value is 30.
The Starting Label Position entered must not be greater than the number of labels available on the selected label type. If it is, the system displays the E0062 standard error message.
The control is enabled when:
A selection is made in the Address Label Printer drop-down list box.
Pause after Generating Label check box
Check this check box to pause the selected printer after generating the labels. This allows the print stock to be changed before the letters are printed. The check box is initially checked when enabled.
The control is enabled when:
The Print Mailing Labels check box is checked.
Select an option in the Notice Type radio button group.
This group box includes controls that allow you to specify whether to generate letters or postcards. The title text of the group box is set to "Notice Type". Select one of the following radio buttons to specify the type of notice to generate:
Letter radio button
Select this radio button to generate a letter as the notice type.
PostCard radio button
Select this radio button to generate a postcard as the notice type.
Select an option in the Type of Appointment Notice radio button group.
This radio button group includes radio buttons to indicate if the appointment or class is rescheduled. The title text of the radio button group is set to "Type of Appointment Notice". Select one of the following radio buttons to specify the type:
Reschedule radio button
Select this radio button to generate a rescheduled appointment notice type.
Standard radio button
Select this radio button to generate a standard notice type.
Click the OK button to generate the system output.
It is the default button for the screen.
It does not have a mnemonic. Its keyboard shortcut is the Enter key.
Depending on which screen originally called the Generate Missed Appointment Notices screen, one of the following screens displays when the button is clicked:
It does not have a mnemonic. Its keyboard shortcut is the Esc (escape) key.
Depending on which screen originally called the Generate Missed Appointment Notices screen, one of the following screens displays when the button is clicked:
If data can be validated and saved on the screen, the following processes occur when the screen is processed:
A process to check for required controls as identified in the Data Map below is performed.
A process to check for valid entries as identified individually for each applicable control in Screen Elements above is performed.
A process to check for edits and cross edits as identified for each applicable control in Screen Elements above is performed.
If any checks or processes fail, a standard error message displays.
If no data can be validated and saved on the screen:
No cross edits are performed.
All values are considered legitimate.
No data is written to the database.
The Data Map defines the values saved for all controls on the screen. If available, any additional notes or comments are displayed in the Notes column.
|
Control Label |
Required |
|
From calendar control |
X (when visible) |
|
To calendar control |
X (when visible) |
|
Address Labels group box |
|
|
Generate Address Label(s) First check box |
· |
|
Address Label Printer drop-down list box |
X (if Generate Address Label(s) First is checked) |
|
Label Type drop-down list box |
X (if Generate Address Label(s) First is checked) |
|
Starting Label Position text box |
X (if Generate Address Label(s) First is checked) |
|
Pause after Generating Label check box |
· |
|
Notice Type radio button group |
X |
|
Type of Appointment Notice radio button group |
X (if enabled) |
|
Software Version: 2.40.00
![]()
