
NOTE: The selections made on the Build Clinic Calendar screen determine the clinic for which business hours are being defined.
Contents Show
The Define Business Hours screen is used to define a clinic's hours of operation.
Appointments can only be scheduled during established resource schedules (which must fall within established business hours).
|
|
NOTE: The selections made on the Build Clinic Calendar screen determine the clinic for which business hours are being defined. |
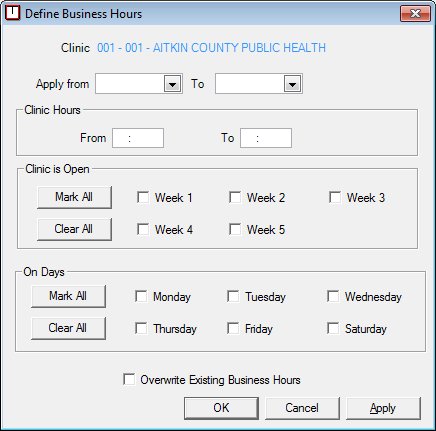
Define Business Hours screen
|
|
Interface InitializationUpon initial display of the screen, the following occurs:
|
·
Unless otherwise stated below, all controls on the Define Business Hours screen are visible and enabled when:
The screen is active.
If one or more special conditions exist that affect a control on the Define Business Hours screen, the condition(s) are documented for that specific control below.
View the name of the clinic selected on the Build Clinic Calendar screen in the Clinic text and value label.
The value label will be filled with the clinic ID and name of the clinic.
Select or enter the date on which the start date range begins for the process in the Apply from calendar control.
The date selected or entered must be equal to or greater than the current system date. If it is not, the system displays the E0010 a standard error message.
Select or enter the date on which the end date range ends for the process in the To calendar control.
The date selected or entered cannot be greater than one year from the current system date. If it is, the system displays the E0021 standard error message.
The date selected or entered cannot be less than the date entered in the Apply from calendar control. If it is, the system displays the E0022 standard error message.
Complete the information in the Clinic Hours group box.
This group box includes controls that allow you to indicate the hours for which to perform the process. The title text of the group box is set to "Clinic Hours". The following controls are included in the group box:
From masked edit box
Enter the beginning of the time frame. The time entered in From must be before the time entered in To, and must be within business hours.
The masked edit box only accepts entry of numeric characters and "AM" or "PM". The mask on the masked edit box is "##:## AA" to accept a four digit time and AM or PM. The control is initially blank.
To masked edit box
Enter the beginning of the time frame. The time entered in To must be after the time entered in From, and must be within business hours.
The masked edit box only accepts entry of numeric characters and "AM" or "PM". The mask on the masked edit box is "##:## AA" to accept a four digit time and AM or PM. The control is initially blank.
Complete the information in the Clinic is Open group box.
This group box includes controls that allow you to indicate the weeks of the month for which to perform the process. The title text of the group box is set to "Clinic is Open". The following controls are included in the group box:
Mark All button
Click this button to check all of the check boxes in the Clinic is Open group box.
Clear All button
Click this button to uncheck all of the check boxes in the Clinic is Open group box.
Week 1 check box
Check this check box to include the first week of the month in the process. Week 1 constitutes calendar days 1-7. The check box is initially unchecked.
Week 2 check box
Check this check box to include the second week of the month in the process. Week 2 constitutes calendar days 8-14. The check box is initially unchecked.
Week 3 check box
Check this check box to include the third week of the month in the process. Week 3 constitutes calendar days 15-21. The check box is initially unchecked.
Week 4 check box
Check this check box to include the fourth week of the month in the process. Week 4 constitutes calendar days 22-28. The check box is initially unchecked.
Week 5 check box
Check this check box to include the fifth week of the month in the process. Week 5 constitutes calendar days 29-31. The check box is initially unchecked.
Complete the information in the On Days group box.
This group box includes controls that allow you to indicate the days on which to perform the process. The title text of the group box is set to "On Days". The following controls are included in the group box:
Mark All button
Click this button to check all of the check boxes in the On Days group box.
Clear All button
Click this button to uncheck all of the check boxes in the On Days group box.
Monday check box
Check this check box to include Mondays in the process. The check box is initially unchecked.
For example, if the Week 1 check box and Monday check boxes are selected, then the process is applied to the first Monday of each month that falls within the specified date range.
Tuesday check box
Check this check box to include Tuesdays in the process. The check box is initially unchecked.
For example, if the Week 1 check box and Tuesday check boxes are selected, then the process is applied to the first Tuesday of each month that falls within the specified date range.
Wednesday check box
Check this check box to include Wednesdays in the process. The check box is initially unchecked.
For example, if the Week 1 check box and Wednesday check boxes are selected, then the process is applied to the first Wednesday of each month that falls within the specified date range.
Thursday check box
Check this check box to include Thursdays in the process. The check box is initially unchecked.
For example, if the Week 1 check box and Thursday check boxes are selected, then the process is applied to the first Thursday of each month that falls within the specified date range.
Friday check box
Check this check box to include Fridays in the process.
For example, if the Week 1 check box and Friday check boxes are selected, then the process is applied to the first Friday of each month that falls within the specified date range.
Saturday check box
Check this check box to include Saturdays in the process. The check box is initially unchecked.
For example, if the Week 1 check box is selected and the Saturday check box is selected, then the process is applied to the first Saturday of each month that falls within the specified date range.
Select the Overwrite Existing Business Hours check box to indicate that any business hours already defined for a day that is included in the selected days should be first deleted before the new business hour range is applied.
The check box is initially unchecked. If the modified business hours cause currently defined resource schedules or group education classes to fall outside of business hours, the system will display the Event Log - Define Business Hours screen with the text "The hours entered conflict with currently defined resource schedules and/or group education classes. Changes can not be made to the established business hours that cause resource schedules or group education classes to fall outside of the business hours."
Click the Apply button to process the screen and/or save the data captured on the screen if applicable.
The screen is not closed when clicked. This allows you to perform additional processes on the screen quickly and easily.
It has a mnemonic of "A".
The Event Log - Define Business Hours screen displays when the button is clicked. Once closed, the Define Business Hours screen is displayed.
Click the OK button to process the screen.
It is the default button for the screen, unless otherwise noted.
It does not have a mnemonic. Its keyboard shortcut is the Enter key.
Previous records that were saved using the Apply button are already stored in the database and therefore are not affected when this button is clicked.
Upon successful completion of the edits the system inserts BusinessHour records for each of the specified days.
The Event Log - Define Business Hours screen displays when the button is clicked. Once closed, the Build Clinic Calendar screen is displayed.
It does not have a mnemonic. Its keyboard shortcut is the Esc (escape) key.
Previous records that were saved using the Apply button are already stored in the database and therefore are not affected when this button is clicked.
The Build Clinic Calendar screen displays when the button is clicked.
If data can be validated and saved on the screen, the following processes occur when the screen is processed:
A process to check for required controls as identified in the Data Map below is performed.
A process to check for valid entries as identified individually for each applicable control in Screen Elements above is performed.
A process to check for edits and cross edits as identified for each applicable control in Screen Elements above is performed.
If any checks or processes fail, a standard error message displays.
If no data can be validated and saved on the screen:
No cross edits are performed.
All values are considered legitimate.
No data is written to the database.
The Data Map defines the values saved for all controls on the screen. If available, any additional notes or comments are displayed in the Notes column.
|
Control Label |
Required |
Table |
Column |
Notes |
|
Clinic |
· |
BusinessHour |
ServiceSiteID |
· |
|
Apply from |
X |
BusinessHour |
StartTime |
· |
|
To |
X |
BusinessHour |
EndTime |
· |
|
From |
X |
· |
· |
· |
|
To |
X |
· |
· |
· |
|
Clinic is Open |
X |
· |
· |
· |
|
On Days |
X |
· |
· |
· |
|
Software Version: 2.40.00
![]()

