Contents Show
The Loan Breastpump to Location screen is used to loan a consigned breast pump to a different location.
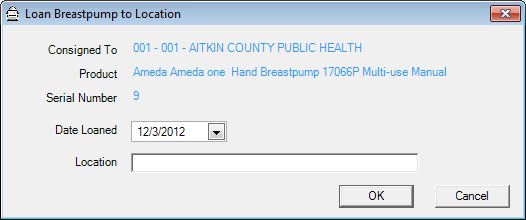
Loan Breastpump to Location screen
|
|
Interface InitializationUpon initial display of the screen, the following occurs:
|
Unless otherwise stated below, all controls on the Loan Breastpump to Location screen are visible and enabled when:
The screen is active.
If one or more special conditions exist that affect a control on the Loan Breastpump to Location screen, the condition(s) are documented for that specific control below.
View the inventory location the breastpump is currently consigned to in the Consigned To text and value label.
View the manufacturer, brand, type, and subclass use/type of the breastpump that was loaned in the Product text and value label.
It will display the product description concatenated from the MANUFACTURER, MANUFACTURERBRAND, and MANUFACTURERBRANDTYPE tables for the product in the PRODUCT table plus the descriptions for the subclass use and subclass type from the Reference Dictionary for 'INVPDCTSUBCLASSUSE' and 'INVPDCTSUBCLASSTYP'.
View the identification number for the breastpump that was loaned in the Serial Number text and value label.
Select or enter the date on which the breast pump was loaned in the Date Loaned calendar control.
Enter the location to which the breast pump was loaned in the Location text box.
The text box allows the entry of alphabetic, and special characters. Special characters are limited to the following: period (.), comma (,), hyphen (-), and apostrophe ('). The maximum number of characters that can be entered in the text box is eighty (80) characters.
Click the OK button to process the screen.
It is the default button for the screen, unless otherwise noted.
It does not have a mnemonic. Its keyboard shortcut is the Enter key.
The Manage Consigned Breastpumps screen displays when the button is clicked.
It does not have a mnemonic. Its keyboard shortcut is the Esc (escape) key.
The Manage Consigned Breastpumps screen displays when the button is clicked.
If data can be validated and saved on the screen, the following processes occur when the screen is processed:
A process to check for required controls as identified in the Data Map below is performed.
A process to check for valid entries as identified individually for each applicable control in Screen Elements above is performed.
A process to check for edits and cross edits as identified for each applicable control in Screen Elements above is performed.
If any checks or processes fail, a standard error message displays.
If no data can be validated and saved on the screen:
No cross edits are performed.
All values are considered legitimate.
No data is written to the database.
The Data Map defines the values saved for all controls on the screen. If available, any additional notes or comments are displayed in the Notes column.
|
Control Label |
Required |
Table |
Column |
Notes |
|
Date Loaned |
X |
InventoryItem |
StatusDate |
· |
|
· |
· |
InventoryItem |
Set Status to L=Loaned |
· |
|
Location |
X |
InventoryItem |
LoanedLocation |
· |
|
· |
· |
InventoryItemHistory |
Add a row to history for each add/update of the inventory item |
Trackable Products Only |
|
Software Version: 2.40.00
![]()
