Contents Show
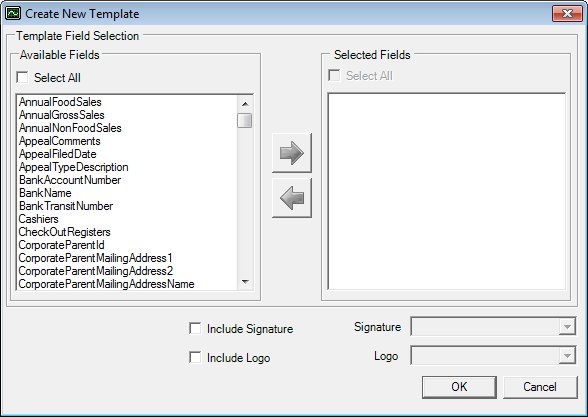
The Create New Template screen is used to generate custom letter templates as Microsoft Word documents that can include a single logo, any number of mail merge fields, and/or a single user's signature. These custom templates may be modified and saved to any hard drive the user has available. They can be used at a later date to generate e-mails, faxes, printed documents, and mailing labels for recipients selected on the Send Form Letters screen.
For more information about the special merge fields that can be used in the e-mail body content, see the Custom Template Merge Fields topic.
Create New Template screen
|
|
Interface InitializationUpon initial display of the screen, the following occurs:
|
Unless otherwise stated below, all controls on the Create New Template screen are visible and enabled when:
The screen is active.
If one or more special conditions exist that affect a control on the Create New Template screen, the condition(s) are documented for that specific control below.
Complete the information in the Template Field Selection group box.
This group box includes the controls to select or remove specific mail merge fields within the new custom template being created. The title text of the group box is set to "Template Field Selection". The following controls are included in the group box:
Available Fields group box
This group box includes the controls for selecting the available mail merge fields. The title text of the group box is set to "Available Fields". The following controls are included in the group box:
Select All check box
Select this check box to select all list items in the list box. Deselect this check box to deselect all list items in the list box.
Available Fields list box
Select one or more mail merge fields in this list box. Single or multiple selections are allowed.
The mail merge fields in the list box are displayed in alphabetical order. This list box is populated from the ALIAS column of the MAILMERGEFIELDS table (SYSTEMNAME = "VENDOR" AND PROCESSNAME = "CUSTOMMAILMERGE" AND ACTIVE = "Y" AND OBJECTTYPE = "C").
Select button
Click the Select button (pictured below) to move the list item(s) highlighted in the Available list box to the Selected list box.

The list item(s) is added to the Selected list box and removed from the Available list box when clicked.
The control is enabled when:
A selection is made in the available list box.
If the user selects the button and has not made a selection from the Available list box, the system displays the E0284 standard error message.
Remove button
Click the Remove button (pictured below) to move the list item(s) highlighted in the selected list box to the available list box.

The list item(s) is added to available list box and removed from the selected list box when clicked.
The control is enabled when:
A selection is made in the selected list box.
Selected Fields group box
This group box includes the controls for viewing and managing the selected mail merge fields. The title text of the group box is set to "Selected Fields". The following controls are included in the group box:
Select All check box
Select this check box to select all list items in the list box. Deselect this check box to deselect all list items in the list box.
Selected Fields list box
This list box contains all mail merge fields selected for the new template from the Available Fields list box. Single or multiple selections are allowed. The mail merge fields in the list box are displayed in alphabetical order. Address fields are selected or deselected as a group in order to ensure that mailing labels can be generated from a custom mail merge template.
Select the Include Signature check box to indicate that a user's signature is included in the template.
The check box is initially unchecked. If the user checks the check box, the system verifies the permission level of the signed on user. If the user does not have permission to include signatures, the system displays the E0006 standard error message.
When this check box is checked, the Signature drop-down list box is enabled if the signed-on user has the appropriate permissions to include signatures in a template.
Select the name of the staff member who has an electronic signature on file based on the user's permissions in the Signature drop-down list box.
The control is enabled when:
The Include Signature check box is checked.
The content of the drop-down list box is filtered depending on the permission level of the signed-on user. The drop-down list box is populated based on one of the following:
If the user has permission to use other staff members' signatures when creating a template, the drop-down list box contains the names of all staff members who have signatures on file. The drop-down list box includes the signed-on user if they have captured their own signature.
If the user does not have permission to use other staff members' signatures when creating a template, but the user has captured their own signature, their name displays in the drop-down list box. No other names are included.
If the user does not have permission to use other staff members' signatures in a template, and the user has not captured their own signature, the drop-down list box is empty. The user is not able to include a signature on the template.
Select the Include Logo check box to indicate that an image or logo is included in the template.
The check box is initially unchecked. If the user checks the check box, the system verifies the permission level of the signed on user. If the user does not have permission to include images or logos, the system displays the E0006 standard error message.
When this check box is checked, the Logo drop-down list box is enabled if the signed-on user has the appropriate permissions to include signatures in a template.
Select the image name of the image or logo on file in the Logo drop-down list box.
The control is enabled when:
The Include Logo check box is checked.
When including images and logos in a template, the user is able to place them and move them around within the template. Images and logos do not work as watermarks that are displayed behind text. They can be used in headers and footers within the templates.
Images and logos are stored on the server. ZIP compression is used to store the images and logos in the CONTENTS column of the VENDORLOGO table.
Click the OK button to process the screen.
It is the default button for the screen, unless otherwise noted.
It does not have a mnemonic. Its keyboard shortcut is the Enter key.
If all validation checks pass, then a Microsoft Word document is created and displayed.
The logo (if any) will be appended, delimited with a carriage return. The selected mail merge fields (if any) will be appended next in alphabetical order, delimited by carriage returns. The signature (if any) is appended last, delimited by carriage returns. All of the applicable items will be left justified. Once the document has been created, it is displayed directly in the Microsoft Word application as a new document in memory. The user must then format the new system generated document by positioning the mail merge fields and adding text to complete the letter content. Once the letter has the desired content and format, it should be saved as a custom template and then save to a desired location for use in the Send Form Letters screen. The template will be lost after the Microsoft Word application has exited unless it is saved.
It does not have a mnemonic. Its keyboard shortcut is the Esc (escape) key.
The Vendor List screen displays when the button is clicked.
If data can be validated and saved on the screen, the following processes occur when the screen is processed:
A process to check for required controls as identified in the Data Map below is performed.
A process to check for valid entries as identified individually for each applicable control in Screen Elements above is performed.
A process to check for edits and cross edits as identified for each applicable control in Screen Elements above is performed.
If any checks or processes fail, a standard error message displays.
If no data can be validated and saved on the screen:
No cross edits are performed.
All values are considered legitimate.
No data is written to the database.
The Data Map defines the values saved for all controls on the screen. If available, any additional notes or comments are displayed in the Notes column.
|
Control Label |
Control Type |
Table. Column |
Notes |
|
Available Fields |
list box |
MailMergeFields. Alias |
The valid values for this list box come from a select query where MailMergeFields.ObjectType = "C" and MailMergeFields.Active = "Y" |
|
~Selected Fields |
list box |
· |
These are selected from the Available Fields list box. |
|
Signature |
drop-down list box |
UserESign. UserID |
· |
|
Logo |
drop-down list box |
VendorLogo. Description |
· |
~ Denotes a required control (if applicable). The process that checks for required controls does not occur on screens displayed in read-only or Details mode.
|
Software Version: 2.40.00
![]()
