Contents Show
The Scanned Documents screen is used to view, reassign, and delete scanned documents for a client.
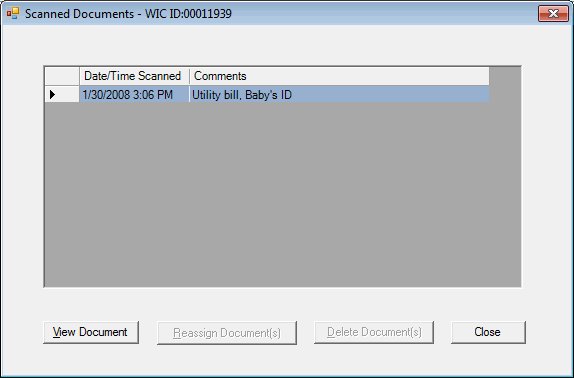
Scanned Documents screen
|
|
|
Unless otherwise stated below, all controls on the Scanned Documents screen are visible and enabled when:
The screen is active.
If one or more special conditions exist that affect a control on the Scanned Documents screen, the condition(s) are documented for that specific control below.
View the information in the Scanned Documents data grid.
This data grid displays a summary for each document scanned for the client. There is no visible title text for the data grid. The data grid is read-only. Select a record in this data grid and click the buttons on the screen to perform additional functions.
The data grid consists of the following control(s):
Date/Time Scanned column
This column displays the date and time the document was scanned for each record displayed within the data grid.
The title of the column is set to "Date/Time Scanned". The information displayed within the column is read-only.
Comments column
This column displays the additional comments for each record displayed within the data grid.
The title of the column is set to "Comments". The information displayed within the column is read-only.
Click the View Document button to display the scanned document image in a separate screen.
The screen used to view the document will vary depending on the scanned document's file format. The system will detect the type of document based on the file extension.
The control is enabled when:
A record is selected in the data grid.
It has a mnemonic of "V".
Upon selection of the View Document button, the selected document is displayed as a PDF in the Adobe Acrobat Reader screen. Note that the DocumentImaging.View permission is required, but validated upon entering View Scanned Documents function.
You can print the document once displayed in the Adobe Acrobat reader as necessary.
Click the Reassign Document(s) button to reassign documents selected in the data grid to a different client or household.
It has a mnemonic of "R".
When the button is clicked, a check is performed to determine whether the logged-on user has the appropriate permissions to view the screen. When the user does not have the appropriate permissions, a standard error message (E0006) displays.
The Reassign Document(s) screen displays when clicked if the user has the appropriate permissions.
Click the Delete Document(s) button to delete one or more of the documents indexed to the current participant or the participant's household.
It has a mnemonic of "D".
When the button is clicked, a check is performed to determine whether the logged-on user has the appropriate permissions to view the screen. When the user does not have the appropriate permissions, a standard error message (E0006) displays.
When the button is clicked, a standard confirmation message (C0004) displays. The options of Yes and No are available. When Yes is clicked, the system deletes the record from the database. The contents on the Scanned Documents screen are refreshed. When No is clicked, the system returns to the Scanned Documents screen (the current screen) without deleting the selected record.
It does not have a mnemonic. Its keyboard shortcut is the Esc (escape) key.
The Participant Folder screen displays when the button is clicked.
If data can be validated and saved on the screen, the following processes occur when the screen is processed:
A process to check for required controls as identified in the Data Map below is performed.
A process to check for valid entries as identified individually for each applicable control in Screen Elements above is performed.
A process to check for edits and cross edits as identified for each applicable control in Screen Elements above is performed.
If any checks or processes fail, a standard error message displays.
If no data can be validated and saved on the screen:
No cross edits are performed.
All values are considered legitimate.
No data is written to the database.
The Data Map defines the values saved for all controls on the screen. If available, any additional notes or comments are displayed in the Notes column.
|
Control Label |
Required |
Table |
Column |
Notes |
|
· |
· |
· |
· |
· |
|
· |
· |
· |
· |
· |
|
· |
· |
· |
· |
· |
|
· |
· |
· |
· |
· |
|
· |
· |
· |
· |
· |
|
Software Version: 2.40.00
![]()
