WEM Installation Guide
System Requirements:
- Windows Server 2008R2 or newer
- Microsoft SQL Server or Microsoft SQL Server Express 2008R2 or newer
Developer Workstation Setup
- Install a standard Visual Studio 2017 development environment, include SQL Server Express or higher.
End User / Server Installation
Initial Setup:
- The first time WEM is installed, the host environment must be prepared by configuring the initial database. It should be an empty database. During setup a user will need DBO rights, but for operation a user will simply need DBReader and DBWriter. Otherwise the database specifics are not important - such as naming and security information. The WIC EBT Middleware will require this only for logging of messages and application events.
Note: The connection string provided at installation must include a security scheme that will provide db_owner rights. The connection string used in the configuration for standard usage, requires only db_datareader and db_datawriter.
Installation:
Installing WEM will be performed by a single installation application. The following deals with the full scope of the installation process.
Installation Steps
-
Execute the MSI - with administrative privileges.
! IMPORTANT: When installing on machines that do not have UAC or have UAC disabled, or in some advanced security configuration it is still necessary to "Run as Administrator" when installing the MSI. Suggested action is to create a simple batch file that invokes msiexec to perform the installation.
Create a file called wem-install-as-admin.cmd on the desktop. It should contain the following line of code.
msiexec -i "<full path to the installer location on hard disk>"
Now right-mouse-button click on the newly created file and choose "run as administrator".
If problems exist, review the Installation Troubleshooting Section.
-
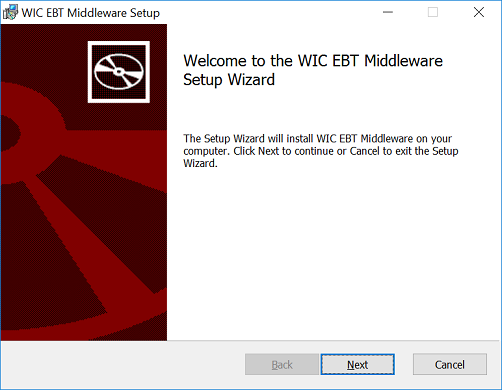
Installation will start with a typical welcome dialog, click next.
-
Installer will prompt for a database connection string.
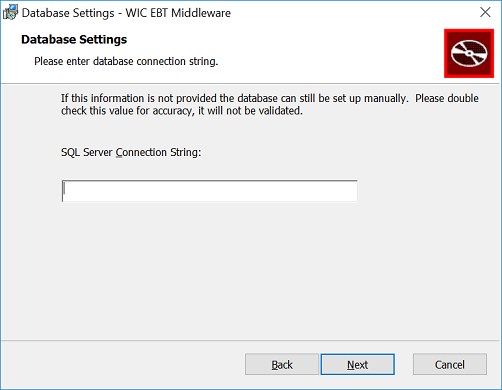
The provided connection string must have DBOwner rights to the database, it can be different from the connectionString used to run the software later
Note: If the installation is an upgrade from a previous version of WEM, and there are no database changes published since the version being updated, this step can be skipped
! IMPORTANT: The installer does not currently validate the connection string provided, please double check it for accuracy before continuing. Once the install completes check the database to ensure the tables were created.
-
Installer will prompt for installation type.
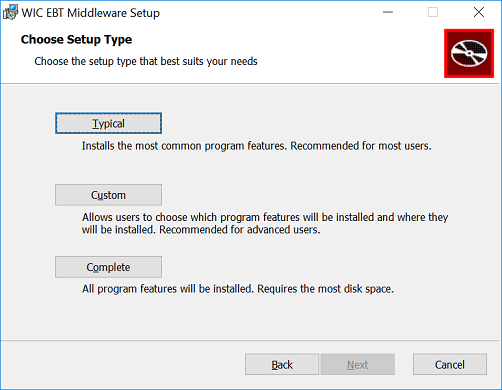
- Typical - Installs all components to c:\program files (x86)\WIC EBT Middleware\
- Complete - Installs all components to c:\program files (x86)\WIC EBT Middleware\
- Custom - Allows specification of the path, and selection of the components that will be installed.
-
If typical or complete is selected, upon clicking next, the installation will begin. However, if custom is selected there are some additional options.
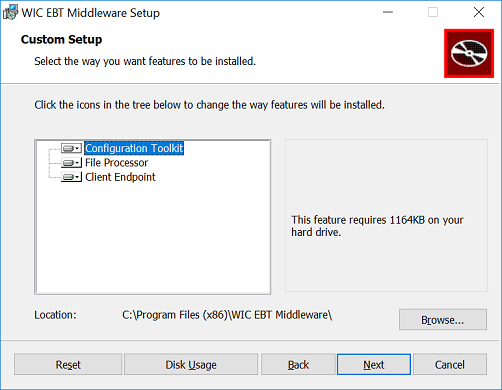
This dialog allows for selection of the individual components to include or exclude from the installation. By default all components are included. It also allows for selection of an alternate destination which points to c:\program files (x86)\WIC EBT Middleware\ by default. To exclude a given component, click the drop-down next to the component's name and a menu of options will be presented.
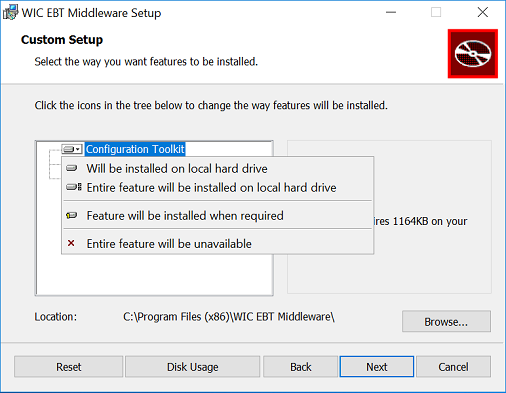
Selecting the option Entire feature will be unavailable will prevent this feature from being installed. Clicking this drop-own again, and selecting the Will be installed on local hard drive option, will re-enable the feature.
To install the software to an alternate location, simply click the Browse button next to the location. This will open a file browser
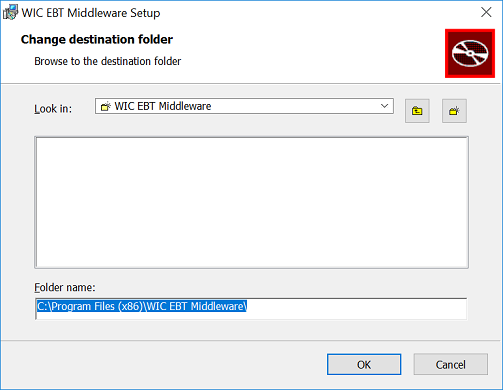
Navigate to the desired path and choose OK to change to the selected directory.
File Folders
WEM handles file conversions, but to do so it needs locations defined where it can look for those files. While the locations are defined in configuration, it is important that they are created physically on the server before attempting to use them. Note: WEM does NOT currently create folders if they do not exist. These folders may be needed on a remote environment, if so use of impersonation (configurable) may also be necessary.
When an endpoint and the WEM are on different boxes
It's important to ensure communication is supported between the WEM and the endpoint for the batch files. Assume for the following example that we have a SPIRIT instance on a machine whose IP Address is 172.30.105.33. Also assume this SPIRIT instance has a local user account WEM with a password of p@ssword123.
On the SPIRIT instance:
- A share should be created for \\172.30.105.33\FileReceivePath$. The SPIRIT system should be configured such that dbo.EBTCONNECTIONINFO.FileReceivePath points to this shared file system path.
- Another share should be created for \\172.30.105.33\FileSendPath$. The SPIRIT system should be configured such that dbo.EBTCONNECTIONINFO.FileSendPath points to this shared file system path.
On the WEM instance the wem-config.json for the MIS Client section should look similar to the following:
"EnableImpersonation": true,
"ImpersonationDomain": <machinename for 172.30.105.33>,
"ImpersonationUser": WEM,
"ImpersonationPassword": p@ssword123,
"ImpersonationPasswordCompare": p@ssword123,
"FileProcessingInbox": "\\\\172.30.105.33\\FileSendPath$",
"FileProcessingOutbox": "\\\\172.30.105.33\\FileReceivePath$",
Similar configuration would be done to the EBT Hosts section and on the EBT instance for messages traveling in the opposite direction.
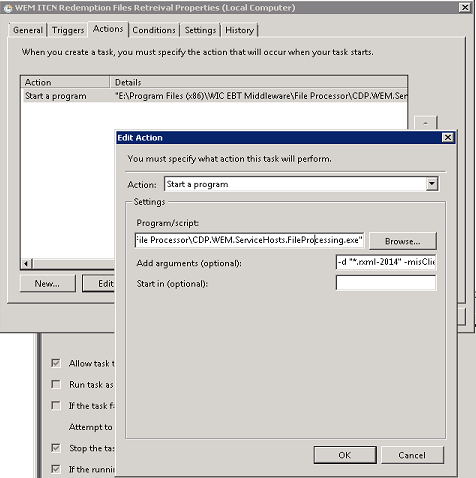
Scheduled Tasks
Support for incoming files (from the EBT system to the MIS) requires a scheduled task to start the file processor as a standalone service to obtain the files from the FTP server.
The WIC EBT Middleware (WEM) file processor handles the communication with various types of file based data transmission. The receiving and transmitting endpoints are defined in the WEM configuration file located at in the install location under the configuration directory.
Usage:
CDP.WEM.Libraries.FileProcessing.exe [-noservice] [-d options] [-ebthost value] [-misclient value]
  -noservice:  Will start the file processing service as a console application
               instead of starting as a windows service.
  -d:          (Optional) Initializes the downloader (-noservice is implied) to
               retrieve specified files from a required -ebthost.
      options:
        *.*          Retrieve all files from the host source.
        filename     Retrieve a file with the specified name from the host source.
                     (default option is *.*)
  -misclient:  (Conditional) Required when the -d flag is present. Allows for the
               specification of an mis client name matching one provided in the WEM
               configuration file.
        value        Specifies the wem configuration name of the MIS client.
  -ebthost:    (Conditional) Required when the -d flag is present. Allows for the
               specification of an ebt host name matching one provided in the WEM
               configuration file.
        value        Specifies the wem configuration name of the EBT host.
For example: Assume the wem-config.json defines an MISClient node with the ClientEndpointName set to MIS1 and it is configured to communicate with the EBTHost defined as ServiceInstanceName* EBT Instance X, and the download task is for the rxml-2014 redemption files. The definition may appear as follows:
CDP.WEM.ServiceHosts.FileProcessing.exe -d "*.rxml-2014" -misclient "MIS1" -ebthost "EBT Instance X"
Note: While the configuration supports a wildcard, "\" as the download option, it is recommended to set a task for each file being retrieved.*
Using Windows Task Scheduler this would be set up such that the Action would define the Program script as the path the file processing.exe file and the arguments would be the specified arguments from the command above.
Troubleshooting
This section will attempt to cover some common troubleshooting scenarios with installation.
Enable MSI Logging
As a first step for troubleshooting it may be beneficial to get logging output from the installer process. This can be done by executing the msiexec.exe application - built into windows - with some specific command line extensions.
usage:
msiexec /i "<PATH_TO_INSTALLER.MSI>" /l* "<PATH_TO_CREATE_LOG_FILE>"
example:
msiexec /i "c:\users\dev\desktop\wem.msi" /l* "c:\users\dev\desktop\wem-install.log"
Configuration Files : Hard Symbolic Links
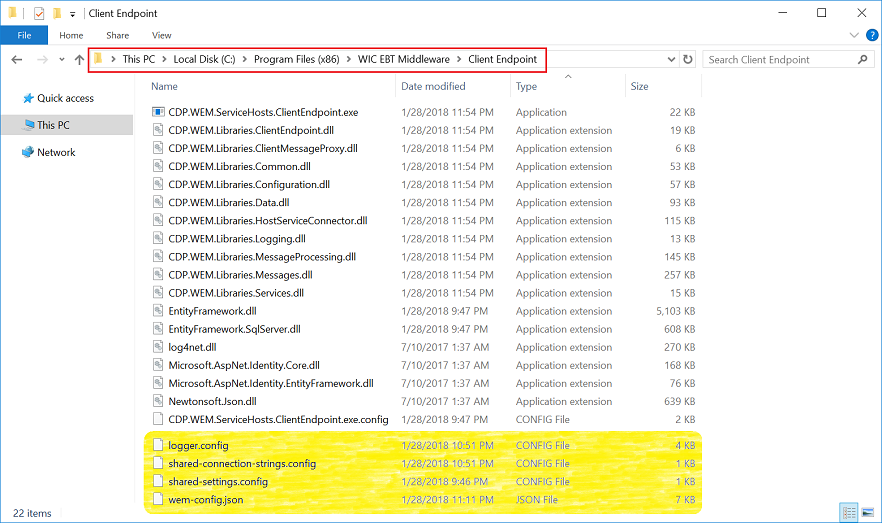
In some test environments on hardened servers, the links to the configuration files are not created properly. To confirm this, check the component folders using File Explorer. Each of the following components, if installed, should have hard file links in their sub-folder:
- File Processor
- Client Endpoint
Each of these component sub-folders should contain the following file links (they will appear as the files themselves, but are pointing to the files in the configuration folder):
- logger.config
- shared-settings.config
- shared-connection-strings.config
- wem-config.json
If these are not created during the installation, then the Message Processing Host will also likely fail to install or start. To work around this issue, it may be necessary to tidy up the installation manually. This involves a two-step process. First create the symbolic links by creating a batch script that points to the files as shown below.
Note, this script is for a scenario where the files were installed to a drive D:\ path by choosing a custom location. It will be necessary to change the references in the file if the installation chosen was typical or complete, or a custom install that left the default, or changed the path to a different location.
REM -- Create the links into the Client Endpoint folder.
mklink /h "D:\Program Files (x86)\WIC EBT Middleware\Client Endpoint\shared-settings.config" "D:\Program Files (x86)\WIC EBT Middleware\Configuration\shared-settings.config"
mklink /h "D:\Program Files (x86)\WIC EBT Middleware\Client Endpoint\shared-connection-strings.config" "D:\Program Files (x86)\WIC EBT Middleware\Configuration\shared-connection-strings.config"
mklink /h "D:\Program Files (x86)\WIC EBT Middleware\Client Endpoint\logger.config" "D:\Program Files (x86)\WIC EBT Middleware\Configuration\logger.config"
mklink /h "D:\Program Files (x86)\WIC EBT Middleware\Client Endpoint\wem-config.json" "D:\Program Files (x86)\WIC EBT Middleware\Configuration\wem-config.json"
REM -- Create the links into the File Processor folder.
mklink /h "D:\Program Files (x86)\WIC EBT Middleware\File Processor\shared-settings.config" "D:\Program Files (x86)\WIC EBT Middleware\Configuration\shared-settings.config"
mklink /h "D:\Program Files (x86)\WIC EBT Middleware\File Processor\shared-connection-strings.config" "D:\Program Files (x86)\WIC EBT Middleware\Configuration\shared-connection-strings.config"
mklink /h "D:\Program Files (x86)\WIC EBT Middleware\File Processor\logger.config" "D:\Program Files (x86)\WIC EBT Middleware\Configuration\logger.config"
mklink /h "D:\Program Files (x86)\WIC EBT Middleware\File Processor\wem-config.json" "D:\Program Files (x86)\WIC EBT Middleware\Configuration\wem-config.json"
Note: If any of the primary components were excluded, for example client endpoint, the component should be excluded from this batch file as well.
Then, if installation completed, uninstall the WEM MSI file. Once the uninstall completes, reinstall WEM using the MSI file. The hard links will not be removed by the uninstall, and the second execution of the installation will succeed.
See WEM Configuration for Additional Setup information