
IMPORTANT: If the EOD process is scheduled to start after the EOM process, the EOM process must have enough time to complete before the EOD is scheduled to start or the EOD process will fail.
After completing the Application Server installation, it is necessary to add a scheduled task with two actions to run the End of Day (EOD) process using the Windows Task Scheduler.
States/ITOs should run End of Day (EOD) and End of Month (EOM) processes in the following order:
Run the original End of Day Process - only required if your state's environment supports checks
Run the new End of Day Command Line Batch Processing
Run the new End of Month Command Line Batch Processing
|
|
IMPORTANT: If the EOD process is scheduled to start after the EOM process, the EOM process must have enough time to complete before the EOD is scheduled to start or the EOD process will fail. |
Before beginning the steps outlined below, display the Windows Desktop.
Complete the following steps to add a scheduled task for the original End of Day and the new End of Day Command Line Batch Processing:
1. Click Start on the Windows Taskbar.
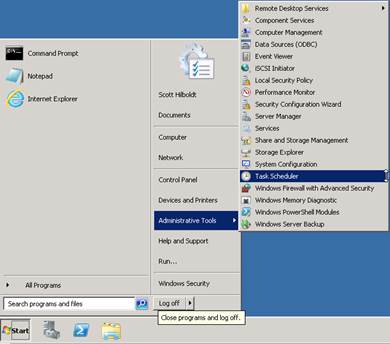
Figure 2-1 – Administrative Tools sub-menu (Start menu)
2. Point to Administrative Tools, and then select the Task Scheduler sub-menu.
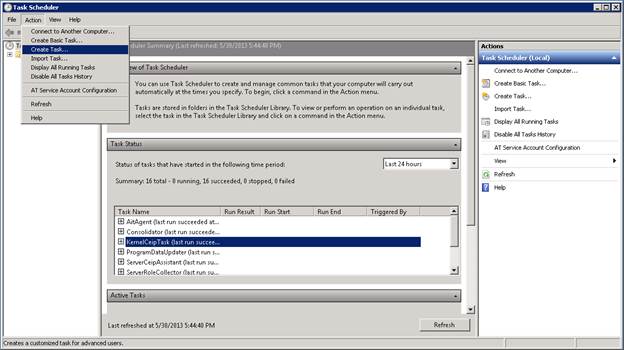
Figure 2-2 – Action menu (Task Scheduler screen)
The Task Scheduler screen displays. The screen is used to schedule tasks for Windows to run at designated times.
3. Select the Create Task menu option on the Action menu.
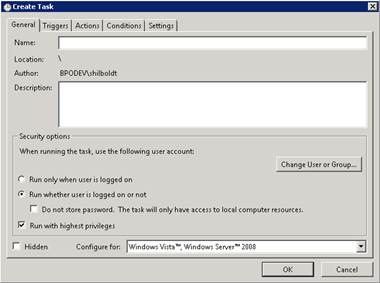
Figure 2-3 – General tab (Create Task Action)
The General tab of the Create Task screen displays. The screen is used to schedule a task.
|
|
NOTE: The user account used to run the task is, by default, the one used to log on to Windows. Clicking the Change User or Group button allows the user account used to run the task to be changed. |
4. Enter a Name for the task (e.g., "State – EOD - Both existing and new").
5. Enter a Description for the task (e.g., "The processing that must occur after the close of business each day.").
6. Select the Run whether user is logged on or not radio button.
7. Check the Run with highest privileges check box.
8. Click the Triggers tab.
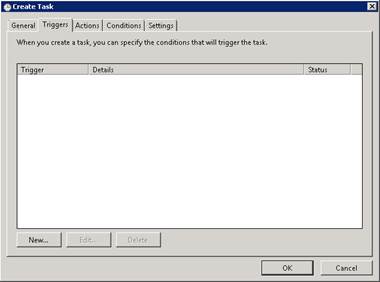
Figure 2-4 – Triggers Tabbed Page (Create Task Screen)
The Triggers tab on the Create Task screen displays. The screen is used to schedule a task.
9. Click the New button.
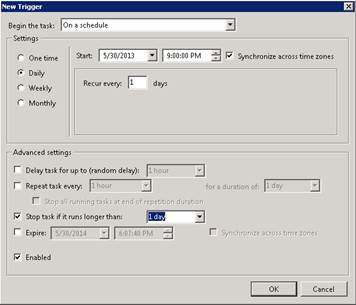
Figure 2-5 – New Trigger Screen
The New Trigger screen displays. The screen is used to set a trigger for a task.
10. Select the "On a schedule" option in the Begin the task drop-down list box.
11. Select the Daily radio button in the Settings radio button group.
12. Select the Start date on which Windows should start running EOD.
13. Select the Start time on which Windows should start running EOD.
|
|
IMPORTANT: If the EOD process is scheduled to start after the EOM process, the EOM process must have enough time to complete before the EOD is scheduled to start or the EOD process will fail. |
14. Enter "1" in the Recur every [x] days text box.
15. Select the Stop task if it runs longer than check box and select the "1" from the available drop-down list box to stop the task if the duration of the task runs for more than one day.
16. Select the Enabled check box.
17. Click the OK button.
The Triggers tab on the Create Task screen displays.
18. Click the Actions tab.
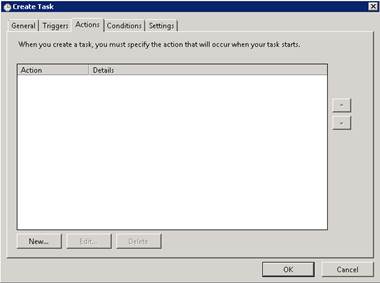
Figure 2-6 – Actions tab (Create Task screen)
The Actions tab on the Create Task screen displays. The screen is used to set the action that occurs when the trigger is activated.
19. Click the New button.
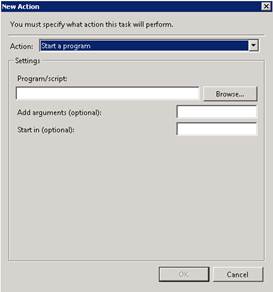
Figure 2-7 – New Action screen
The New Action screen displays. The screen is used to set an action for a task.
20. Select the "Start a program" option in the Action drop-down list box to create an action for the original End of Day Process.
21. Click the Browse button to display a Browse screen that allows navigation to and selection of the EODProcess.exe file in the folder in which the InstallShield wizard installed the Application Server. The path to the file and the file name are returned by the Browse screen and displayed in the Program/script text box when the OK button on the Browse screen is clicked.
OR
Enter the path to the file and its name (i.e., "{drive letter}:\Program Files\{folder}\EODProcess.exe") in the Program/script text box.
22. Enter the name of a site created by the InstallShield wizard for the Application Server in the Add arguments (optional) text box.
|
|
NOTE: The name of each site created by the InstallShield wizard can be found in the EODProcess.xml file located in the folder that the InstallShield wizard installed the Application Server. |
23. Click the OK button.
24. Click the New button.
Figure 2-7 – New Action screen
The New Action screen displays. The screen is used to set an action for a task.
25. Select the "Start a program" option in the Action drop-down list box to create an action for the End of Day Command Line Batch Processing.
26. Enter "BatchProcessor.exe -EOD [CN]" in the Program/script text box. Windows Task Scheduler will automatically modify the Program/script and Add arguments (optional) text boxes to set parameters for the command.
|
|
NOTE: The [CN] attribute above identifies the [State Identifier Code] attribute specified in the Windows environment variable for your state's environment. Windows environment variables are added during the Create Environment Variables within the Windows Operating System process of the BatchProcessing_Core.zip Installation and Configuration. See the State Identifier Codes topic for more information. |
27. Enter "{drive letter}:\Program Files\Spirit\BatchProcessing\" in the Start in (optional) text box.
|
|
NOTE: Replace the path and folder above with the path and folder name where the content of the BatchProcessing_Core.zip was extracted. See the BatchProcessing_Core.zip Installation and Configuration topic for more information. |
28. Click the OK button.
|
|
NOTE: After adding scheduled tasks, a reboot may be required. |
This completes the steps to create a scheduled task for both EOD processes for a single site. If multiple sites were created by the InstallShield wizard during the installation of the Application Server, a scheduled task for both EOD processes must be created for each site.
See the Application Server Installation Guide topic for more information.
|
Software Version: 2.40.00
![]()