This section covers the process of installing the Application Server for the SPIRIT WIC System. The Application Server is also known as the End of Day (EOD) server and the End of Month (EOM) server because both back‑end processes are run on it.
Before beginning the installation steps outlined below, locate the automated installation file for the Application Server. Its name is ApplicationServer.exe and should be located in the same folder as this installation document.
Complete the following steps to install the Application Server:
1. Open the ApplicationServer.exe file.
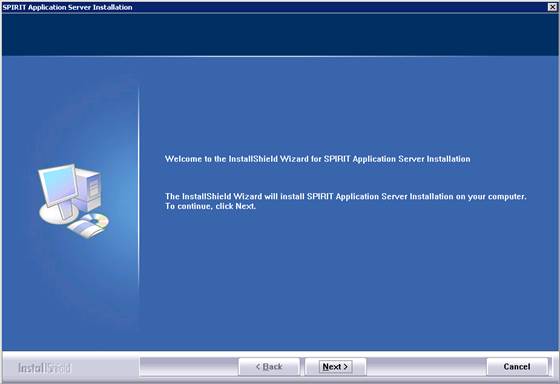
Figure 1-1 – Welcome screen
The Welcome screen of the SPIRIT Application Server Installation InstallShield wizard displays.
|
|
NOTE: Clicking the Cancel button terminates the installation process and closes the wizard. All information collected by the wizard is discarded. |
2. Click the Next button.
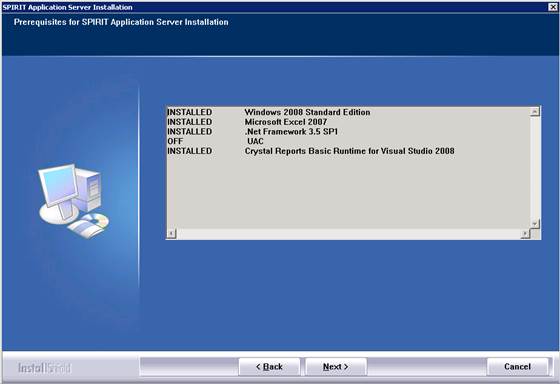
Figure 1-2 – Prerequisites for SPIRIT Application Server Installation screen
The Prerequisites for SPIRIT Application Server Installation screen displays. The screen lists all components required by the SPIRIT Application Server and identifies whether they are installed and setup properly.
If any required components are marked as Not Installed, the installation will not work properly. Once the required components are installed, another attempt can be made to install the SPIRIT Application Server.
|
|
NOTE: Crystal Reports Basic Runtime software should be downloaded from the following location: Verify the operating system to determine which version should be installed. |
If all required components are marked as Installed, the installation can continue.
3. Click the Next button.
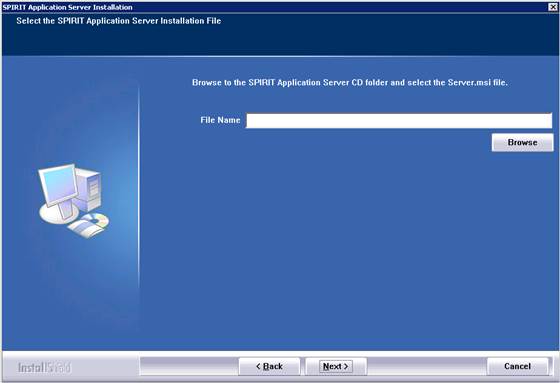
Figure 1-3 – Select the SPIRIT Application Server Installation File screen
The Select the SPIRIT Application Server Installation File screen displays. The screen requires the name of the file to be specified in the File Name text box. The MSI file specified is the file that the wizard will install.
4. Click the Browse button to display a Browse screen that allows navigation to and selection of the Server.msi file. The path to the selected file and the file name are returned by the Browse screen and displayed in the File Name text box when the OK button on the Browse screen is clicked.
OR
Type the path to the Server.msi file and its name in the File Name text box.
5. Click the Next button.
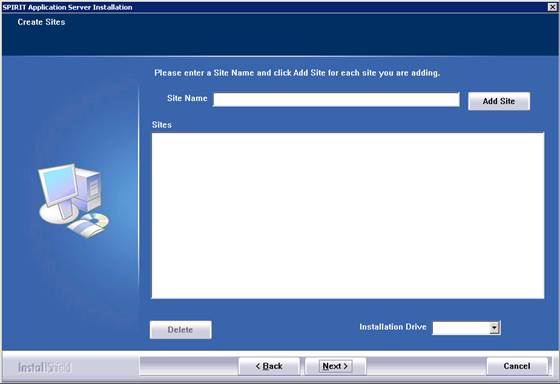
Figure 1-4 – Create Sites screen
The Create Sites screen displays. The screen requires one or more sites to be added to the Sites list box. A site is required for the successful operation of the End of Day (EOD) and End of Month (EOM) processes.
6. Enter the name of a site in the Site Name text box.
7. Click the Add Site button to add the site to the Sites list box.
8. Repeat the two previous steps as necessary until all necessary sites have been added to the Sites list box.
|
|
NOTE: Clicking the Delete button removes sites from the Sites list box. |
9. Select an Installation Drive from the drop-down list box.
|
|
NOTE: A Sites folder, in which each of the added sites will be located, will be added to the selected installation drive. |
10. Click the Next button.

Figure 1-5 – SMTP Settings screen
The SMTP Settings screen displays. The screen requires e-mail settings to be specified for the End of Day process. The EOD process cannot generate notifications successfully without a connection to an e-mail server, and this screen allows the connection to be specified and tested.
11. Enter the SMTP Server.
12. Enter the Sender E-mail Address.
|
|
NOTE: The SMTP server name is the name of the e-mail server used to send out e-mail notifications generated by the End of Day process, and the sender e-mail address is the address used in the From line of each e-mail notification sent out. |
13. Click the Test button.
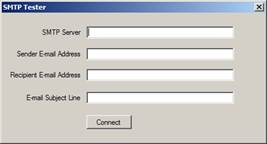
Figure 1-6 – SMTP Tester screen
The SMTP Tester screen displays. The screen collects information to test the connection to the e-mail server. The SMTP Server and Sender E-mail Address text box display the values entered on the SMTP Settings screen by default.
14. Enter the e-mail address for the recipient of the test e-mail in the Recipient E-mail Address text box.
15. Enter the subject of the test e-mail in the E-mail Subject Line text box.
16. Click the Connect button.
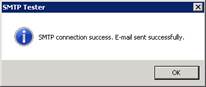
Figure 1-7 – SMTP Tester standard information message
If the connection is successful, the SMTP Tester standard information message displays with a message indicating success.
17. Click the OK button.
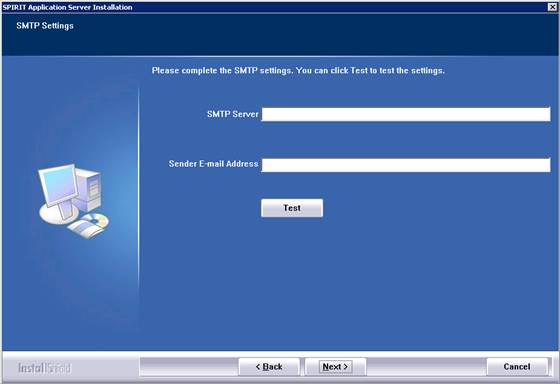
Figure 1-8 – SMTP Settings screen
The SMTP Settings screen displays. The screen displays the values entered previously.
18. Click the Next button.
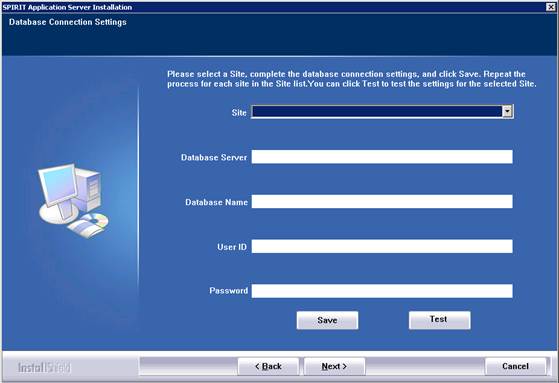
Figure 1-9 – Database Connection Settings screen
The Database Connection Settings screen displays. The screen requires the user to specify the database connection settings for each site that was added on the Create Sites screen. The EOD and EOM processes cannot run successfully without a connection to the database server, and the Database Connection Settings screen allows the connection to be specified and tested.
|
|
NOTE: The drop-down list for the Site box includes an entry for each site entered on the Create Sites screen. |
19. Select a site in the drop-down list for the Site drop-down list box.
20. Type the machine name or IP address of the database server to be used in the Database Server text box.
21. Type the name of the database to be used with the selected Site in the Database Name text box.
22. Type "spirit" (without quotes) in the User ID to access the database.
23. Type "sp1r1t76" in the Password text box to access the database.
24. Click the Test button.

Figure 1-10 – SPIRIT Database Connection Tester screen
The SPIRIT Database Connection Tester screen displays. The screen collects information to test the connection to the database server. The Database Server, Database Name, User ID, and Password text boxes display the values entered on the Database Connection Settings screen by default.
25. Click the Connect button.
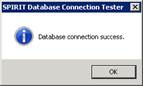
Figure 1-11 – SPIRIT Database Connection Tester standard information message
If the connection is successful, the SPIRIT Database Connection Tester standard information message displays with a message indicating success.
26. Click the OK button.
Figure 1-12 – Database Connection screen
The Database Connection Settings screen displays. The screen displays the values entered previously.
27. Click the Save button.
|
|
NOTE: Clicking the Save button encrypts the database connection information and saves it to the SessionSettings.xml file for the site selected in the Site drop-down list box:
|
28. Repeat steps 19 through 27 as necessary until database connection settings have been saved for each of the sites available in the Site drop-down list box.
29. Click the Next button.
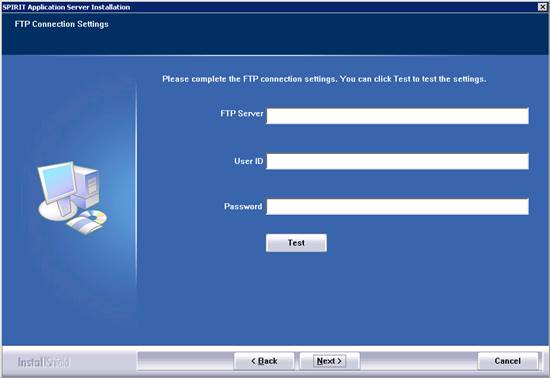
Figure 1-13 – FTP Connection screen
The FTP Connection Settings screen displays. The screen requires the user to specify the FTP connection settings for the Application Server. The settings are used to transfer files to a banking entity.
30. Type the machine name or IP address of the FTP server to be used in the FTP Server text box.
31. Type the ID used to access the FTP server in the User ID text box.
32. Type the password used to access the FTP server in the Password text box.
|
|
NOTE: If the WIC program does not have a banking contract, dummy entries must be entered for the FTP Server, User ID, and Password values. |
33. Click the Test button.
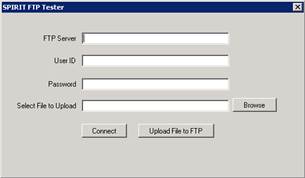
Figure 1-14 – SPIRIT FTP Tester screen
The SPIRIT FTP Tester screen displays. The screen collects information to test the connection to the FTP server. The FTP Server, User ID, and Password text box display the values entered on the FTP Connection Settings screen of the SPIRIT Application Server Installation InstallShield wizard.
34. Click the Connect button.
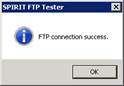
Figure 1-15 – SPIRIT FTP Tester standard information message
If the connection is successful, the SPIRIT FTP Tester standard information message displays with a message indicating success.
35. Click the OK button.

Figure 1-16 – FTP Connection screen
The FTP Connection Settings screen displays. The screen displays the values entered previously.
|
|
NOTE: Instead of, or in addition to, the simple connection test, a file can be uploaded to the FTP server to test the connection. To do so, complete the following steps on the SPIRIT FTP Tester screen:
OR Type the path to the upload file and its name in the Select File to Upload text box.
The SPIRIT FTP Tester attempts to connect to the FTP site first. The following standard information message displays if the connection is successful:
Figure 1-17 – SPIRIT FTP Tester standard information message
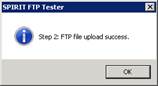
The SPIRIT FTP Tester attempts to send the file to the FTP site. The following standard information message displays if the upload is successful.
Figure 1-18 – SPIRIT FTP Tester standard information message
The FTP Connection Settings screen displays. The screen displays the values entered previously. IMPORTANT: After uploading a test file to the FTP server, be sure to delete the file to prevent an accumulation of junk files on the server. |
36. Click the Next button.
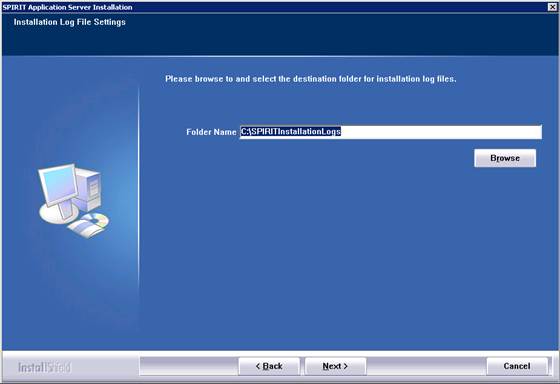
Figure 1-19 – Installation Log File Settings screen
The Installation Log File Settings screen displays. The screen requires the Folder Name to be specified. The installation log file for the Application Server will be saved to the specified folder.
|
|
NOTE: The value in the Folder Name text box defaults to C:\SPIRITInstallationLogs. If the value must be changed, do one of the following:
OR
|
37. Click the Next button.
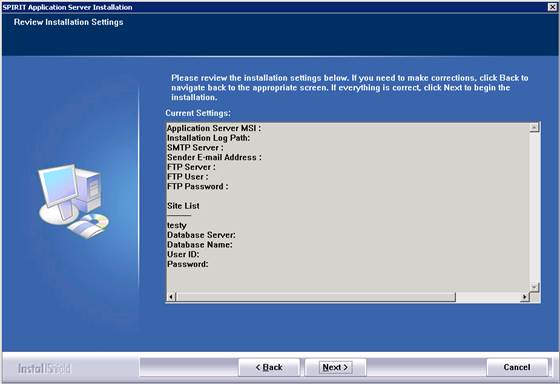
Figure 1-20 – Review Installation Settings screen
The Review Installation Settings screen displays. The Current Settings text box displays the installation settings that will be applied when the Next button is clicked and allows them to be verified before continuing.
|
|
NOTE: If any of the information displayed on the screen is incorrect, click the Back button to navigate back to the associated settings screen and update the settings as necessary. |
38. If all information displayed on the screen is correct, click Next button to begin the installation.
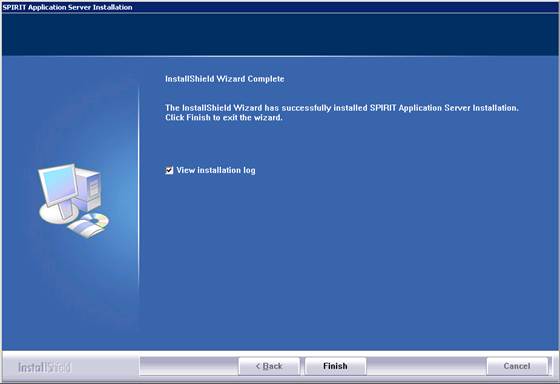
Figure 1-21 – InstallShield Wizard Complete screen
The InstallShield Wizard Complete screen displays. The screen indicates that the installation has completed successfully.
39. Click the Finish button to exit the installer.
|
|
NOTE: The View installation log check box is selected by default to display the installation log when the Finish button is clicked. Please review the installation log to verify whether the installation was successful. |
The InstallShield Wizard is closed; and, if the View installation log check box was selected, the installation log is displayed.
|
Software Version: 2.40.00
![]()